
Processing bank payments means to allocate and classify bank payments after the bank statements have been imported to Sage Accounting.
Bank payments completes the other side of a business’ bank account entries. Knowing and understanding how to apply Sage’s bank features will give you have a clear complete picture of how to deal with all your bank statement transactions that have been imported to Sage Accounting.
The post’s objective.
My objective with this post is to:
- empower my audience,
- show you all the features of Sage Accounting applicable to bank payments
- so that you can utilise the software to its fullest potential in your own environment.
I hope to simplify bank payments to a coherent level as you follow me. Thereby enable you to reduce admin tasks and costs for your business.
It is important to know that the Sage Accounting software is built to address the needs of business owners. You don’t need to be an accounting expert, or a bookkeeper to use Sage.
Sage provides you with the tools to confidently manage your business on a live accounting system. Then you can simply invite your accountants to your books, from where they can calculate and file your taxes.
Why bank are recording of bank payments important?
Businesses will not be operational or functional if it was not for the important aspect of recording and reporting of bank payments in an accounting system.
Banks do an excellent job of processing transactions and keeping a record or ledger of the money flow in your business. In previous posts we have learned how to transfer bank transactions to our business’ accounting system without having to manually capture details or entering transactions in a book system.
The next step for us is to identify these transactions and to appropriately deal with them. There are numerous types of bank payments in a business. We classify and allocate the payments to its category depending on what was paid from the bank.
From Workspace to Sage’s Banking transactions.
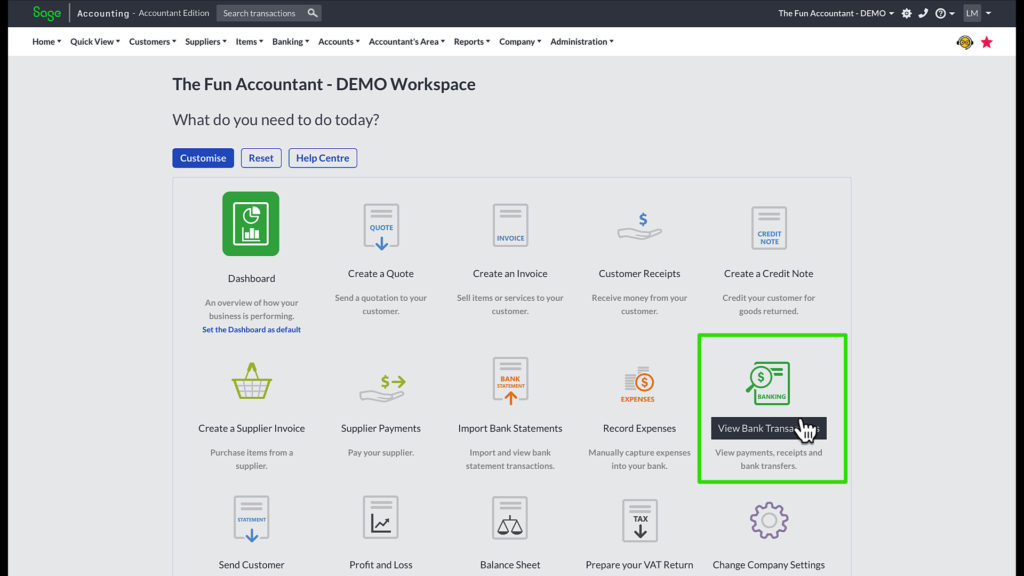
Navigate to the banking page by clicking on the banking widget which takes us directly to the banking screen.
In the banking screen select the bank account that you want to work with and all the transactions imported will appear in the “New transactions” tab.
To Sage’s Banking transactions from anywhere else.
In the top navigation menu bar:
- Click on banking,
- down to Transactions and
- to the right to banking again.
Orientation of Sage banking.
The banking page in Sage looks like a spreadsheet with heading columns and transaction rows. The headings are important as a guide to your bank process and its layout can be reorganised as per your preferences.
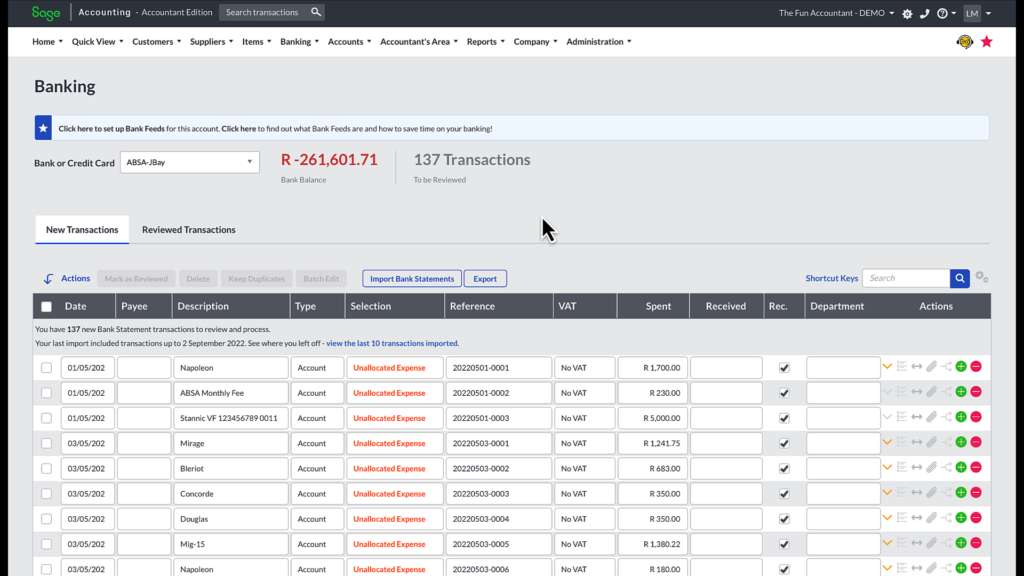
Unallocated expense in orange font are transactions that still have to be assigned or classified to its appropriate category.
At the bottom of the page I can see the quantity of transactions and the number of transaction pages.
My favourite profile setting is set to 50 transactions per page which is the maximum number of transactions that can be displayed on a single page.
You can jump between pages by clicking on the page number.
Bank transactions can be sorted by the heading descriptions and in that way you can separate bank payments from bank receipts if you want to deal with them separately.
Sage banking headings.
- The Date of the transactions.
- The Payee can be filled in or left blank if enough detail is presented in the next description column.
- The Description column which is the description that was entered for the transaction when the bank payment was done. It is important for your business to pay attention to what description is being used in the bank when making a payment to a supplier.
- Type: There are five types of bank transactions that you can choose from. The types are:
- The Account for processing directly to an expense ledger account like bank charges, or interest paid.
- Customer type transaction for allocating receipts to specific customer accounts.
- Supplier for allocating payments to supplier accounts and normally to match a payment to a supplier bill.
- Transfer for recording transfers between different bank or cash accounts.
- VAT payments and receipts are selected to allocate a VAT transaction between the business and Revenue Service.
- The Selection heading for selecting the
- Income and expense category or
- The specific supplier and customer account or
- The specific bank account in case of a transfer or
- A specific VAT period that you want to allocate a VAT payment or receipt.
- The reference which is a unique identifier of a transaction. Upon import of bank statements, this number is created by the system.
- VAT is to classify the VAT as standard rate, zero, exempt or No VAT. When paying suppliers there should be No VAT as VAT has been dealt with when the supplier invoice was recorded in the accounting system.
- Then the Spent column is where the focus will be in this post which is the bank payment amounts.
- We have the Received column for our bank deposits and receipts.
- The Rec. is the bank reconciliation confirming that the amount agrees to what actually occurred in the bank statement. Tick marks already exists upon bank imports, because the imported bank transactions should agree and reconcile to the bank statements. With manual captured entries there will not be any tick marks in the Reconcile tick box next to the transactions.
- An Analysis code if you have any.
- Then we have the Actions main heading column with more sub-sections in the transaction lines.
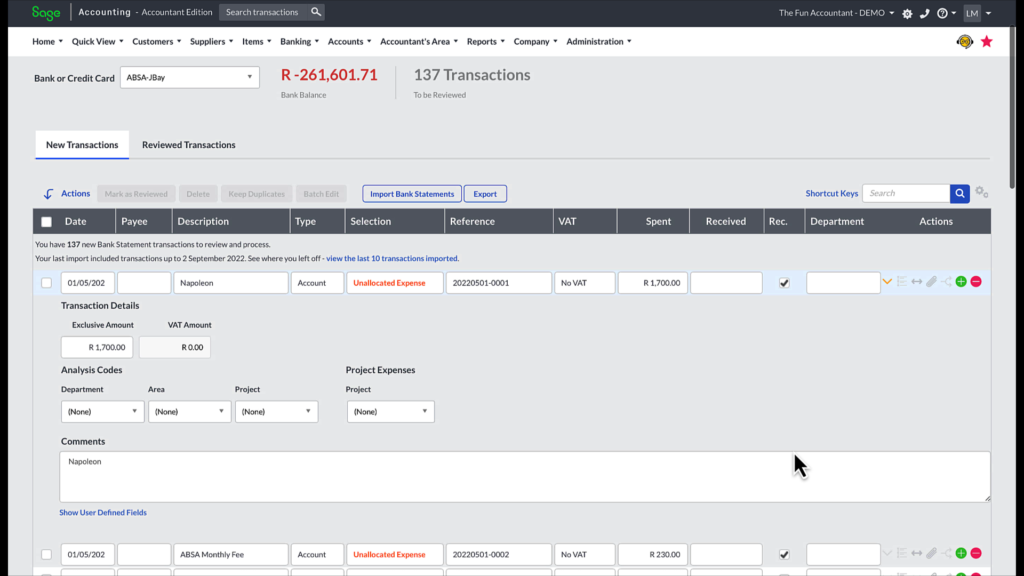
- When you click on the Show More/less downward arrow the space for additional information on a transaction opens. This is handy to expand on a transaction.
I use this section to:
add discounts received,
selecting more Analysis Codes if applicable,
adding a cost to a project if the business uses the Sages Time-Tracking Module
and a Comment section to lengthy expand on a transaction.
To hide the detail or reveal the additional information you just click on the Show More / Less downward arrow. - The Create Rule icon with the 3 dots is to set up a bank statement mapping rule as identifier of the transaction for automatic allocations in future helping you to be more productive and spend less time on allocating bank transactions.
- The double headed arrow to Split a transaction that needs to be divided into different parts. You will definitely encounter instances where you will have to apply the split function.
- Next to the split function yoo get the paperclip icon where you can add an attachment to a transaction.
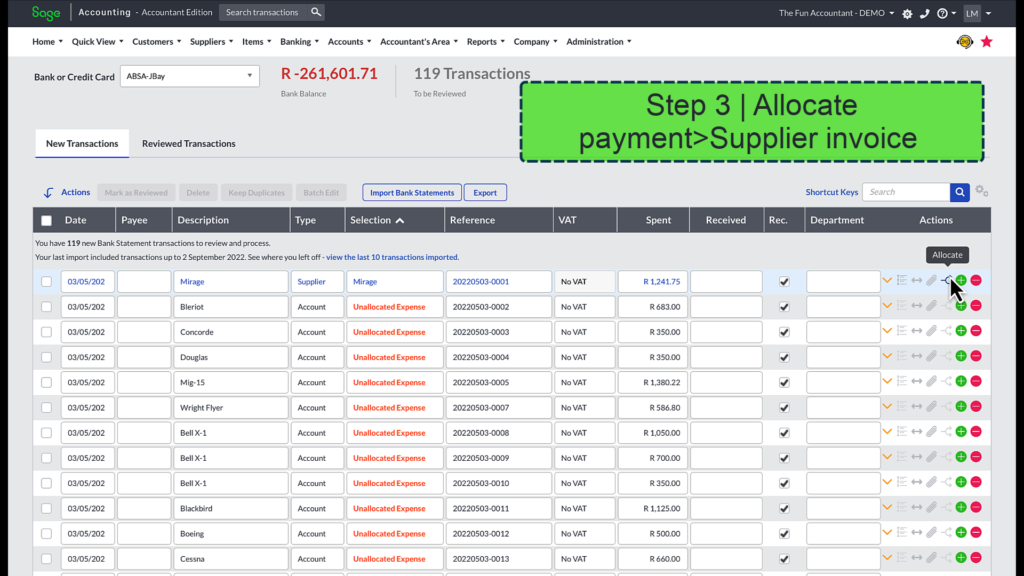
- The Arrow icon that splits upwards and downwards is there to Allocate a payment to a specific supplier invoice or invoices.
- The green plus icon add an additional line below the current one and
- Lastly the red minus icon deletes the transaction line.
Fortunately you don’t need to know what each icon represents, because the icon’s name appears when you hover over it.
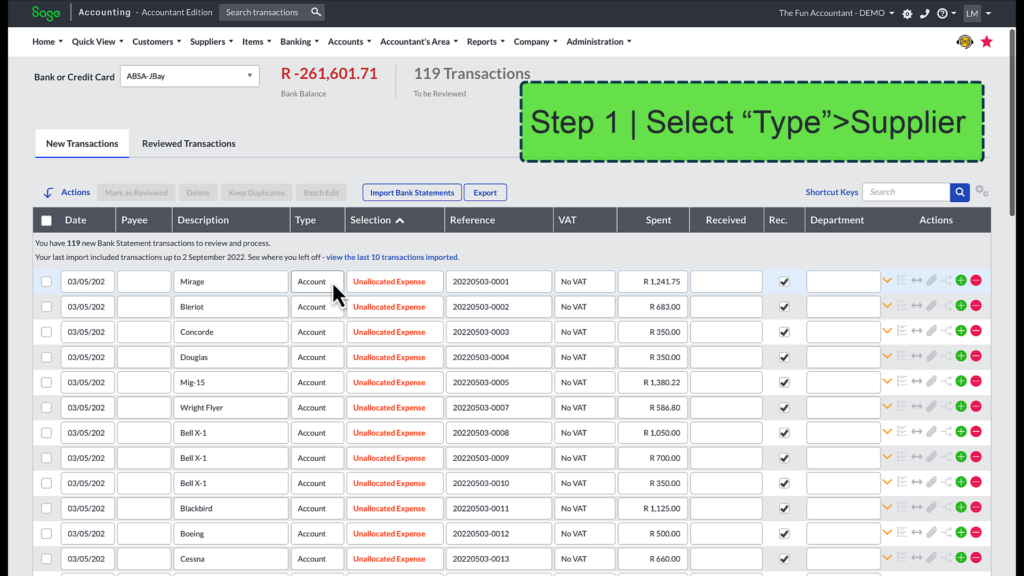
Allocate and categorise supplier payments
Step 1: In the Type column select Supplier.
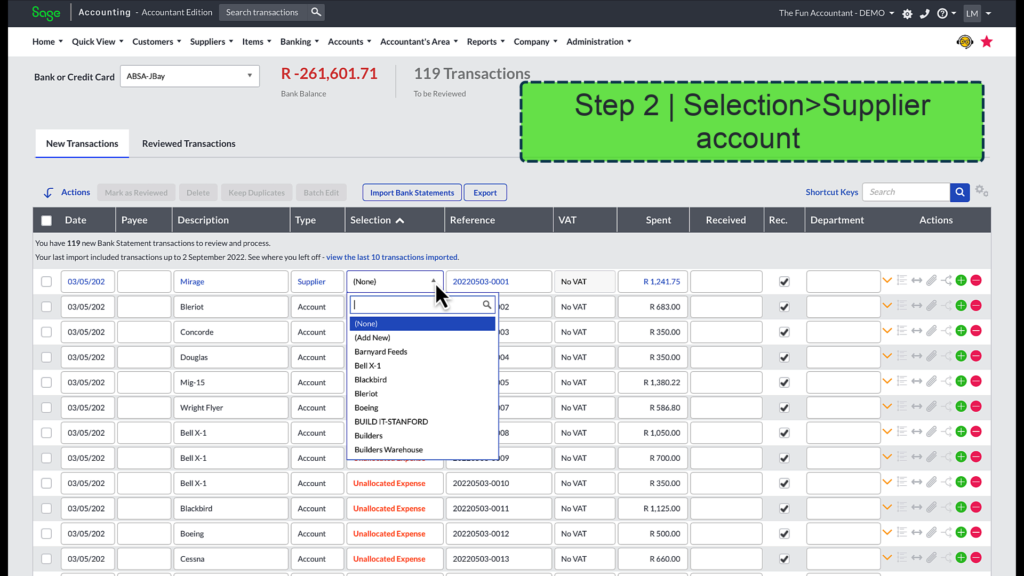
Step 2: Find the supplier account and select it.
Step 3: Allocate the payment to a supplier invoice by matching the payment and invoice and save it.
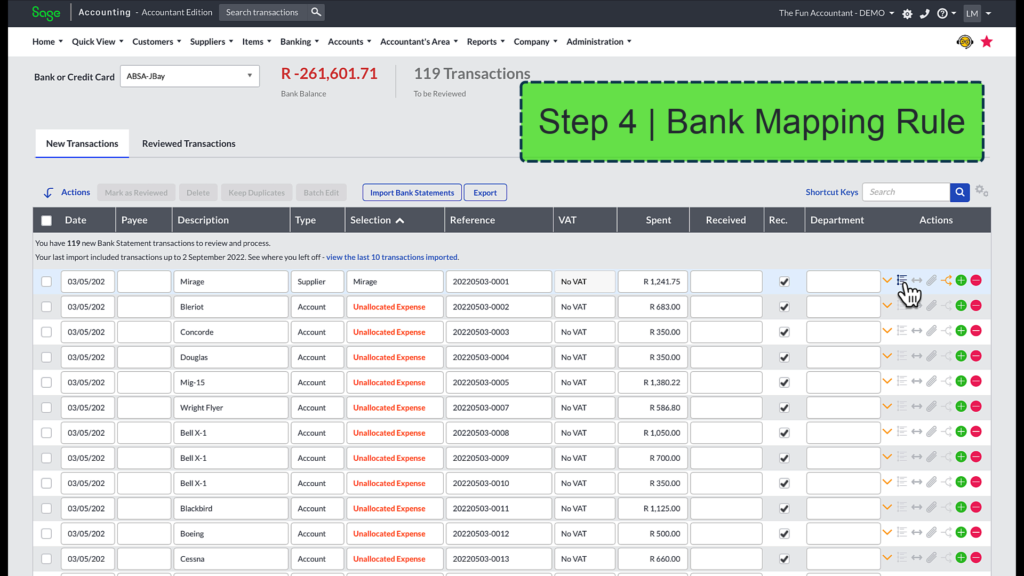
Step4: Create a bank rule, enter the non compulsory PAYEE name or display description field, save the bank Statement mapping Rule.
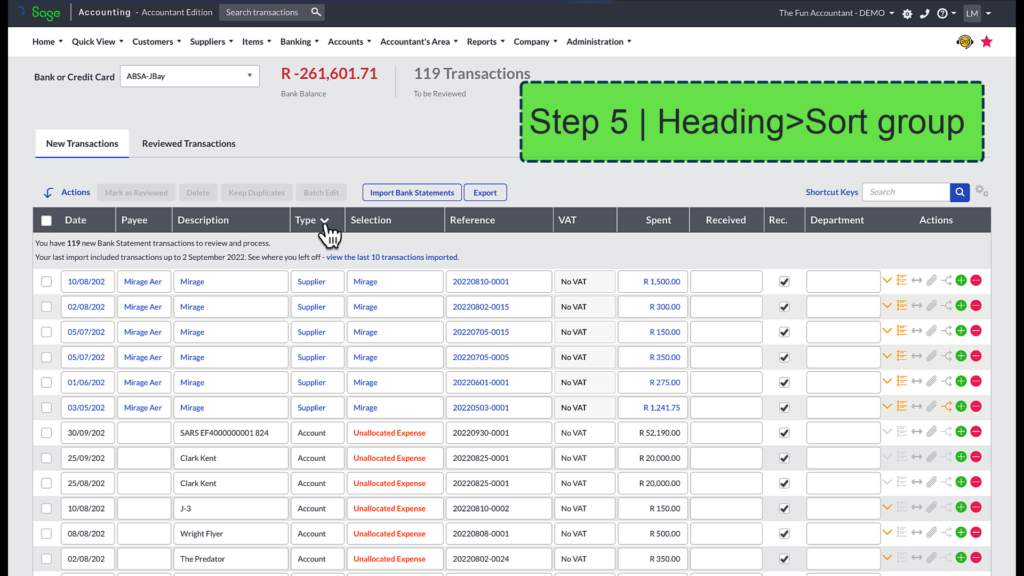
Step 5: Group the payments to the same supplier by using the sort function in the column headings.
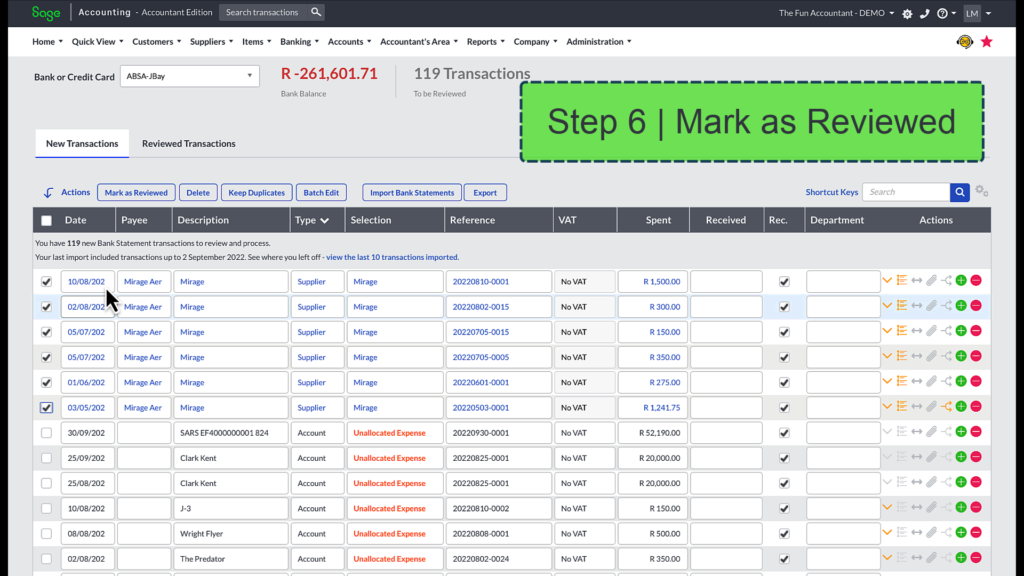
Step 6: Move the supplier transactions that you are finished with to the Reviewed Transactions section.
Bank Statement Mapping Rules
To set up a rule whereby the system will automatically identify a payment and then allocate the payment to the correct supplier or expense account based on the parameters that had been set.
To activate the bank rule you simply click on the “Create Rule” icon at the transaction line.
The first field is computed from the bank description when you set up the rule. The text in this description matches the description found in your bank statement and thereby sets the common criteria that will enable Sage to recognise the bank transaction and then allocate it in the same manner as you have just done. For the rule to work a constant is needed which then tells Sage that this transaction belongs to a specific account.
Tip:You can also use a supplier code when making a bank payment as long as there is a constant in the description that can be used over and over again. For this reason an invoice number cannot be used when making a payment and to set up a rule, because the invoice number is a variable that always changes.
The second field is where you enter a PAYEE name and is optional.
The third field is also optional and when you enter text into this field it is going to replace the description field in your cashbook.
The bank mapping rule is activated by saving it.

Once you have set up a bank rule and transactions are already pre-classified the next step is to allocate the remaining payments and then mark the transactions as reviewed to move it to the reviewed transactions area.
Expense payment bank allocation
A typical Account type transaction and from the description ABSA monthly fee, ABSA being the bank account it can be categorised under bank charges.
The bank charges account can be found under the Selection column by starting to type the word bank, and the bank charges account appears and you select it. VAT standard rate is claimable and the amount is correct as it was imported directly from the bank statement transactions report.
You can also create a bank rule for Account type transactions which frequently occur.
How to create a general ledger account in Sage Accounting
To create a general ledger account do this:
Go to:
- Accounts in the top navigation bar >
- down to lists and then >
- to Lists of accounts
Your list of accounts will open.
To add an account:
- Click on the blue Add an Account button and the New Account screen will open.
- Type in the name of the account.
- Select the category of the account.
- I like to complete the default VAT Type, because it autofills the VAT field and reduces your work of selecting a VAT type when you have a transaction entry to this account.
- You can add extended descriptions to an account as well as
- Notes.
- I have enough information here and I press save where I am taken back to the list of accounts.
Search for accounts within your books.
Another great feature at the list of accounts and to quickly find an account or range of accounts that you are looking for. You use the search function and this is how it works:
Let’s say you would like to see all the loan accounts that you have created in a set of books:
You go to the Search field > Type in the word loan. Click on the search magnifying glass and all the account names that contain the word loan will be displayed with its category.
From here you can make changes to the accounts, mark them as inactive or delete them if you need to.
Dealing with a finance lease (HP / Instalment Sale) repayment.
In the description you find STANNIC VEHICLE FINANCE followed by a series of numbers which is the account number with Standard bank.
The Type is an Account transaction.
To make an account selection you search for Stannic and the Stannic Finance account appears under the Non-Current Liabilities. You select it and this account is set as a NO VAT transaction which is correct and the amount populated from the bank is entered in the Spent column.
To create a bank statement mapping rule, you can fast-track your postings now and in the future. If no entry appears in the Text mapping description it is abnormal because it is normally populated from the bank description. If this happens, DO NOT FEAR here is the solution:
Go back to the New transactions banking screen > Copy the bank description, open the create rule again and paste the bank description in the first field. The last numbers of the account number changes with each month’s payment and you delete it to create a rule based on text that is less strict and which will always form part of the transaction’s description > Save the rule without making any more changes.
VAT payments from the bank
Next we are going to process a VAT payment and this is where we put the VAT Type transaction to use. Normally the VAT periods will appear in the Selection field but if you have not closed any VAT periods you can only select the “VAT payment or refund”. It is a No VAT claimable transaction that you can move to the Reviewed Transactions when you are finished with it.
How to open an additional cashbook (bank account).
To open another bank account:
- Head over to Banking in the top navigation bar.
- Down to Lists and then
- To the right to List of Banks and Credit Cards and
- Click on it. A list of bank accounts will open.
- Click on the button: Add a Bank or Credit Card.
- Fill the details and
- Press Save.
A bank transfer transaction.
An ATM withdrawal is processes as a A bank transfer transaction, why? Because the transfer of the ATM withdrawal will increase the Petty cash account and reduce the bank balance. From the Petty Cash account, cash payments can be allocated against it reducing the petty cash balance.
As with other types of bank transactions you can create a bank statement mapping rule on a bank transfer. The bank rule works like a bomb with bank transfers because you can use the account number as a bank reference in your description for identifying the transfering bank’s account. The ATM withdrawal description also works really well.
Move transactions from “New to Reviewed Transactions.
The bank transactions that have not been finalised can be found by clicking on the New Transactions button, where you proceed to carry on with the allocation process.
It is possible to move all the transactions under the New Transactions bar to the Reviewed Transactions which means you have completed reviewing them.
You do this by clicking on the Actions Tick box next to the date. This selects all your transactions and Sage notifies you of the quantity of the transactions that are selected on which you can perform an action on. Like:
- Mark as reviewed
- Delete
- Perform a batch Edit on and
- Export the selected transactions.
Sort bank transactions in Sage Accounting.
The fastest way to deal with many transactions is to group them together by using the sort function within Sage Accounting.
You can sort the bank transactions by clicking on any of the headings to sort it according to the data under that heading.
A a different type of grouping is to sort the bank transactions by Description. It is clear that this is also a great way of grouping transactions together, we use grouping because it helps us to work faster and with more clarity through our transactions.
You can also group transactions together with the sort function within the “reviewed transactions” section and this is very handy in situations where you need to correct or move a range of transactions. Sage call this group of transactions that you select a batch.
Splitting a bank payment.
There are instances in a business where a payment has to be split between categories for allocation to accounts.
Manual split a bank payment
For example a payment is for VAT and for payroll taxes to revenue services. How do we split this transaction into 2 parts?
You can do it manually by:
Allocating the transaction line and then adding an additional line below the current one:
Copy the date > the description and allocate the transaction to the correct category.
Copy the reference to the second line and type in the split amount of the second part of the transaction in the second line and adjust the first transaction line’s amount.
You need to ensure that both amounts agree to the original transaction amount.
Although this a work-around solution and not the fastest way of doing a split you will find yourself in situations where you have no choice to perform a split like this. The reason for that is that you cannot perform a payment split to a customer in case of a refund as an example using Sage’s built-in Split feature.
Use the Sage built-in split feature.
So how does Sage’s build-in split feature work?
Let’s assume that a payment for payroll taxes to revenue service included penalties. Of course penalties do not form part of the payroll taxes and we have to separate this transaction into 2 parts. Sage designed the split transaction feature for exactly this purpose.
Step 1: Make your allocation Selection for any part of this transaction. The first part of the transaction belongs with Salaries and Wages.
Step 2: Click on the double-headed arrow icon which represents splitting and the Split transaction sub screen will open.
In this area we can split the transactions into many different amounts and categories.
Step 3: As I scroll through my available list of accounts I noticed that there is not an account for penalties and interest. We will have to add it first by clicking on the Add new option.
In the Add New Account sub screen
- enter the account name
- This is an expense type of account which is what I choose in the account Category
- And press save.
Now the account has been added without me having to leave this important section that I have been busy with.
Step 4: No VAT is claimable on SARS penalties and interest. I enter the penalty amount.
Step 5: The payroll taxes amount to R20,000 which is what I enter in the first line.
Step 6: The payment total must agree with the sum of the split total. The split total makes up the sum of all the amounts I have splitted and the remainder is the amount that still needs to be categorised in the split section. Note that Sage will not update this transaction unless the split total agrees with the transaction total and the remainder is zero.
Step 7: Click on Save to save this split.
The Type and Selection description informs you that a Sage split has been performed on this transaction line.
Conclusion

There you have it, we have processed, allocated and reviewed all the bank payments transactions.
Hopefully you have seen and read enough in this post and accompanying video to successfully apply the amazing features of Sage Accounting to reduce your admin work, pivoting you into efficiency and still being precise.
The post and video will be available for you to use as reference to come back to when you are facing the challenge of allocating bank payments.