
In this post I am going to show you how to allocate and record customers’ money received in your business’ bank account with Sage Online Accounting.
The next step after importing bank transactions
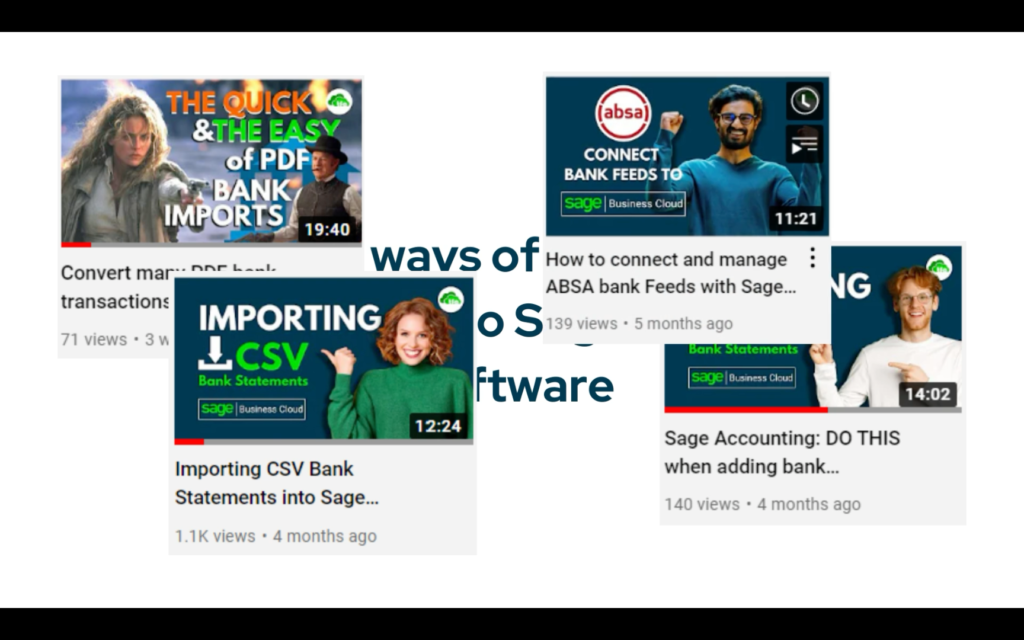
In my previous posts I have shown the various ways of getting bank transactions into the sage accounting system. We looked at automatic bank feeds, PDF conversions, OFX and CSV file imports of bank transactions to Sage.
In this post I am dealing with the next step after you have imported all of those bank transactions. This step is the allocation of transactions to the correct account. I am going to show you how easy it is to deal with bank deposits or money received in Sage.

If you follow the steps and the tips that I am going to show you, you will find that doing the important task of processing customer bank receipts is actually easy to do with Sage. Let’s start shall we?
Bank transfers have become the norm in business
Many if not most of your bank receipts are usually from customers making a payment. In the “cash-less” environment we are living in now, by far if not all customers make payments by some sort of a bank transfer.
Banking cheques have become basically redundant and abnormal for most businesses I come across these days. Receipts are instant and for that reason I prefer to do only one transaction and that is to allocate money received directly from the bank. By allocating directly from the bank I skip a step of recording a receipt and seeking to match it to a bank transaction.
The bank deposit or transfer amounts imported from the bank is the receipt. Not all customers pay exactly an invoice amount as you can see in my video example.
- Some pay a portion of an invoice,
- some pay a previous month’s balance,
- some pay a rounded amount,
- the list of type of payment amounts goes on and on.
Matching the customer bank receipt at the initial stages of processing bank receipts which some of Sage Accounting’s competitors require is a waste of time.
Sage Accounting Software makes provision for matching:
- any receipt to a specific invoice,
- a balance or
- a group of transactions
But that happens at the end of the transaction-line and not at the beginning of the transaction, like other cloud accounting software. This little distinction is important because this makes the processing directly from the bank data possible in Sage Accounting which definitely saves time and results in efficiency and accuracy. How it works in practice will be clear, when you see how I process the bank receipts in Sage Accounting.
If you have a cash register in your business or cash receipt book, the process will be totally different than what I am going to show you.
From the Sage workspace to banking
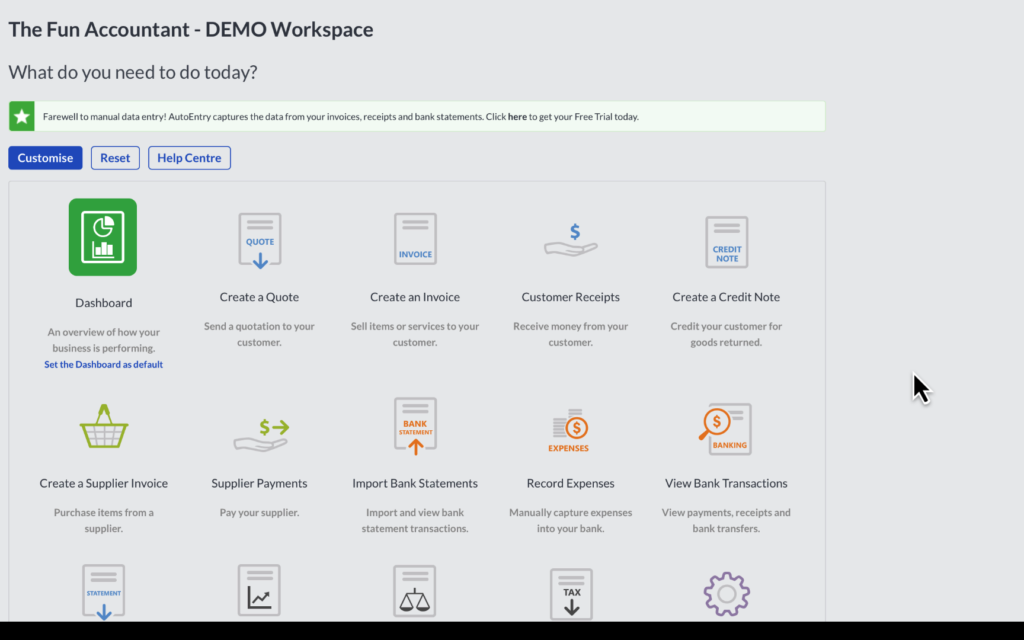
From the workspace area of Sage, to find the bank transactions, you search for the “View Bank Transactions” widget icon and click anywhere on the widget which takes you directly to Sage Banking.
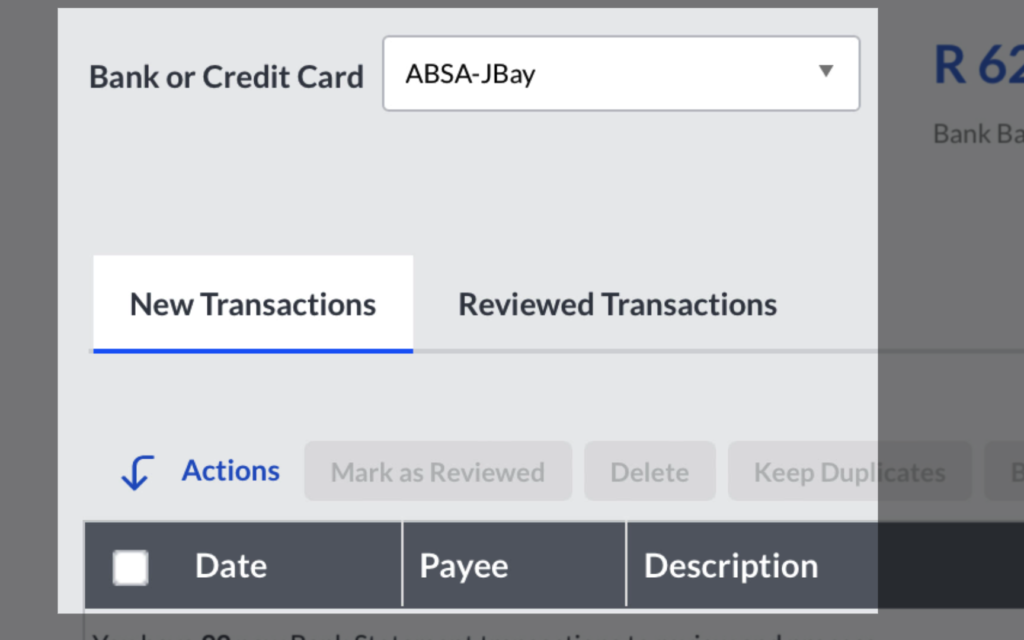
It is important to choose the specific bank account that you want to process.
- Click on the empty field next to “Bank or Credit Card”.
- A list of all your bank accounts will be displayed.
- Select the relevant bank.
Once you have selected the bank account:
- Its balance will be displayed and
- also the number of transactions that needs to be reviewed next to it. Reviewed in this context means to allocate transactions to an account.
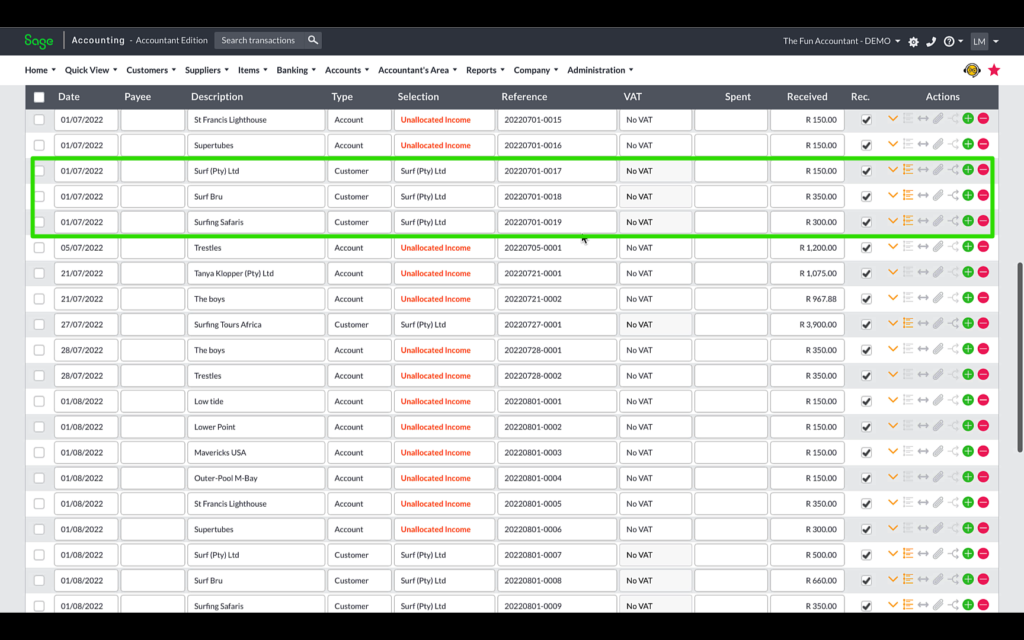
The transaction rows are organised in field columns that look like a spreadsheet.
The headings containing the bank transactions can be amended according to your preferences.
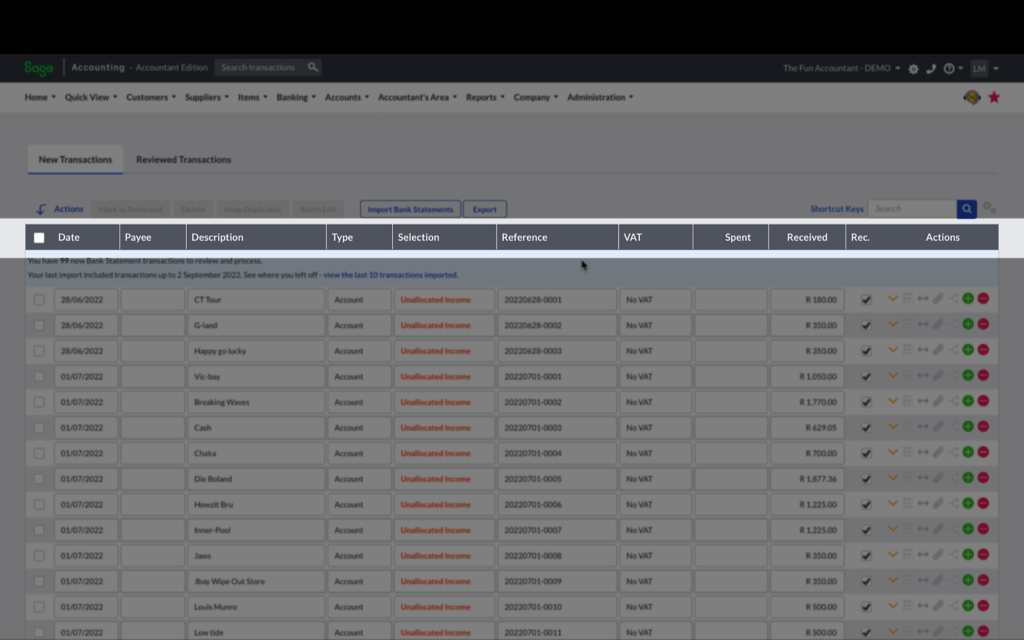
The current column headings of bank transactions from left to right are:
- Date of the transaction.
- The Payee.
- The transaction Description which comes directly from the description of your bank.
- The Type of transaction where you want to allocate to.
You have 5 options to choose from:
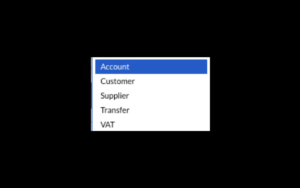
- Specific account.
- A Customer.
- A Supplier transaction.
- A transfer between bank accounts.
- And a VAT payment or receipt allocation.
- The next heading is making a Selection from a dropdown list to select and categorise your transaction.
- A transaction Reference, as a unique identifier of the transaction, which is normally created automatically during the bank import process.
- Choosing VAT type for each transaction if your business is VAT registered.
- Then the bank amount Spent or Received and the
- “Rec” tickbox is the shortened for reconciled.
- Lastly the action buttons which will be discussed later.
For the purposes of this demo I only imported bank receipts and not bank payments, so that we don’t get confused between the payments and receipts. It is important to note that you can just as easily sort your bank transactions by the Received column which will then group all your bank receipts together.

As I scroll down through the transactions you can see that certain transactions have an orange “unallocated Income” description and others are typed in black font. The black font indicates that these transactions have already been allocated.
Sage Bank Statements Mapping Rules
Since, I have not done any allocations yet it can only mean that I have created a bank allocation mapping rule earlier. A bank rule does a number of things but most important ensures the automatic allocation of a receipt based on the identification criteria of the rule. Sage’s bank statement mapping rules are a massive time-saver that can elevate your efficiency to the next level.
In an ideal Sage world you want to create rules for each transaction. By creating rules all your receipts are allocated automatically during the bank statement import phase. It is really easy to create rules.
The 3 buttons and the bottom of the bank transactions page
I have reached the bottom of the page and you can see that there are 2 pages and 99 transactions that need to be dealt with.
You have 3 buttons
- A save button. I use the save button often, because I hate to redo work which can happen if the internet connection drops and I lose connection.
- The “mark selected as reviewed” button. This button moves selected transactions from the New transactions space where we are right now to the Reviewed transactions area.
- “Mark all as reviewed” which will move all the transactions to the reviewed space and it is not something you want to do when you still have Unallocated transactions.
Let me explain the “New transactions” vs the “Reviewed Transactions” a bit more and also give you a handy tip:
I use these 2 different tabs to organise and manage my work.
We are now in the new transactions screen and in my mind it means that I must look at these transactions, ensure that they get allocated correctly, perform certain actions on them, like configuring a rule that will help me in future. Once I am done with a transaction I move it to the Reviewed Transactions area where they are stored and kept and I have thus completed my work on them. Once all the transactions in my New Transactions tab have been dealt with and moved to the reviewed I am finished with the process and this area will be empty.
Processing bank receipts transactions.
In the first transaction line we received R180 in our bank dated 28 June 2022 from CT Tour.
I am going to:
- Select customer under Type. This tells the system that I will need information about customer’s accounts. In the selection drop down list I now need to find the CT Tour customer account and select it.
- The reference given by the bank import is fine to identify the transaction.
- A receipt from the customer should be a no VAT transaction, because VAT is payable on the invoice and not also when the money is received from the customer.
- The downward arrow opens more options on a transaction and I use it mostly to account for discounts allowed and to allocate to analysis codes, if applicable, in this example there are 3 analysis codes.
- Departments where I select the surfboards.
- Area where I select Cape Town.
- Project, I am not going to use it as there are no projects added.
- I could have also expanded on the transaction and added comments if I wanted to.
- The tick mark under the “Rec” which is the abbreviation for reconciliation means that the transaction reconciles or agrees with the bank statement. As this was a bank import and not a manual entry it should be ticked.
- The next icon with the 3 dots is where you can set up a bank statement mapping rule, right here while you have the transaction information on hand.
- Next to the rule icon the left and right arrow is to split one receipt amount into different amounts and then allocate the separate parts to its different accounts. An example of this is where a holding company pays one amount for its different branches and you have to split the receipt among the different customer accounts.
- Then you can add an attachment to this transaction line.
- The next icon is to allocate the receipt to a customer invoice or balance. In other cloud accounting programs this function is called matching the receipt to the customer invoice.
- The green plus icon is to add a transaction line below the one you are currently working in.
- The red minus icon which is the last action button off the transaction line function is to delete the whole transaction entry form the bank register.
Allocating a receipt to an invoice
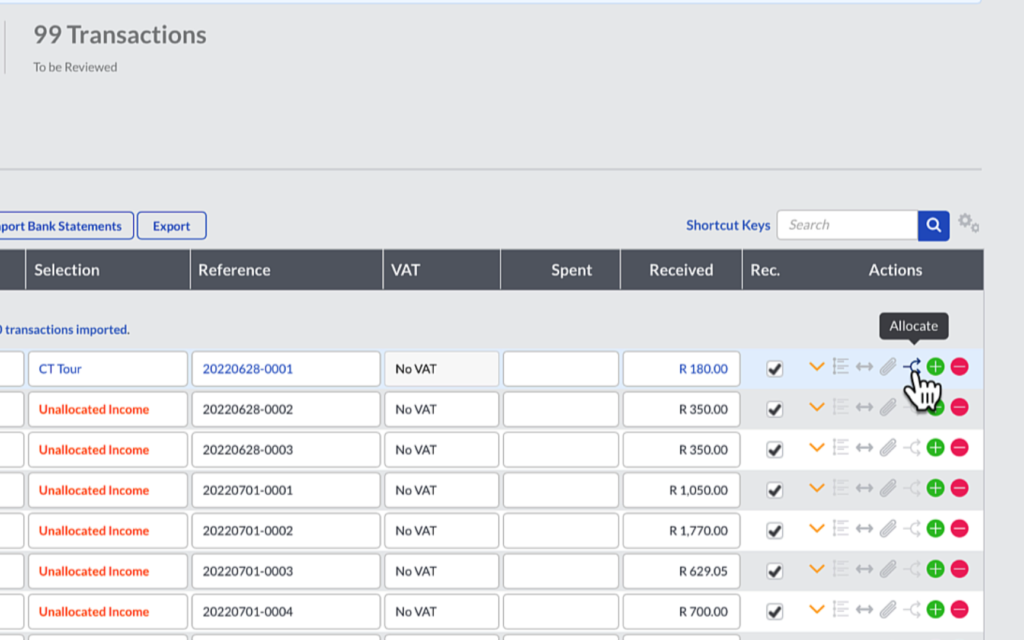
I am first going to see if I can allocate this receipt to an existing invoice before I do anything else by clicking on the Allocate icon which is the icon with the Arrow line going up and down. When I click on it invoices on this particular customer account will appear. There is no invoice to allocate this receipt to, not under the paid invoices or any Unpaid invoices as you can see.
This is strange and it means it is either an error or a prepayment from a customer. I am going to save this action although I did not do any allocations.
Normally if I encounter an abnormality like this I quickly investigate it further which is something I can easily do in Sage. For that I am going to view this customer’s ledger account. I love customer ledgers because they are packed with all the information you need. I was dumbstruck to find that some of Sage’s competitors are unable to give you a proper customer’s or supplier’s ledger.
The customer’s ledger account
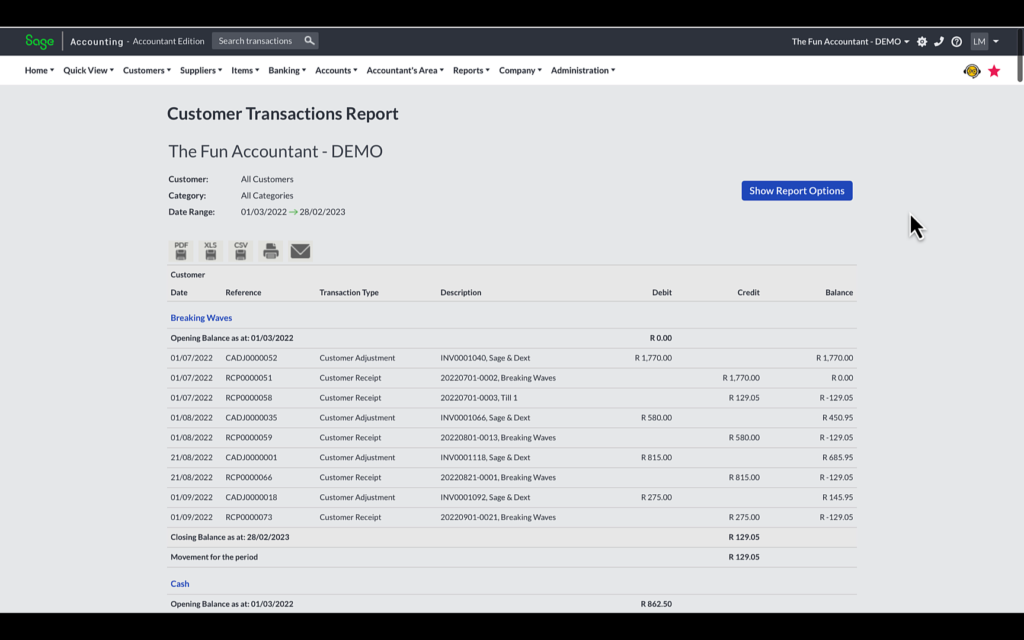
To find a customer’s ledger it go to the top navigation bar under
- Customers, down to
- Reports, to the right to
- Customer Transactions and down to
- Customer Transactions which is the “ledger” in accounting language and click on it.
In the Customer Transactions Report you can:
- specify the date range and
- select all customers or a range of customers or select a particular customer that you need the detailed transactions on. I am going to choose and select CT Tour and
- View Report.
The only transaction displayed is the receipt I have just allocated. I am going to assume that this is a prepayment for a sales order. This example shows you how easy it is to deal with prepayments by customers and to have it reflected on their account. I have dealt with a cloud accounting software where you could not record a deposit from a customer without an invoice. The prepayment had to be allocated to a temporary account and could only be cleared once an invoice had been created. With one or two invoices it is fine but when a business requires a deposit before an order can be executed it is a nightmare to clear that temporary account, those clients have since switched over to Sage Accounting once they have seen how prepayments are easily dealt with in Sage.
Let’s go back to allocating bank transactions and this time we use the route from the top navigation bar to
- Banking, down to
- Transactions, to the right to
- Banking and
- Click on it
How to set up a bank statement mapping rule for a customer receipt
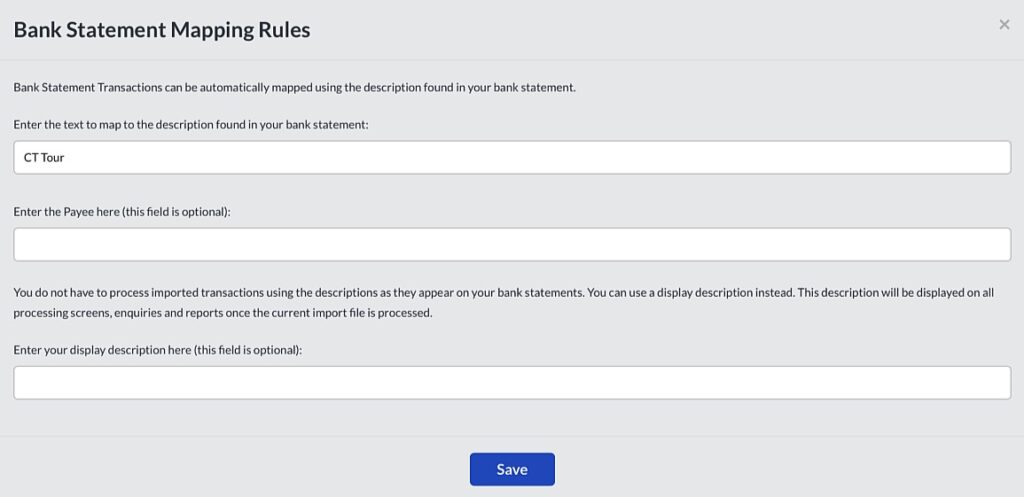
Once back at the bank transactions, the first thing I want to do is to set up a bank allocation rule, in order to do that click on the 3 bullet point icon.The Bank Statement Mapping Rules menu will open.
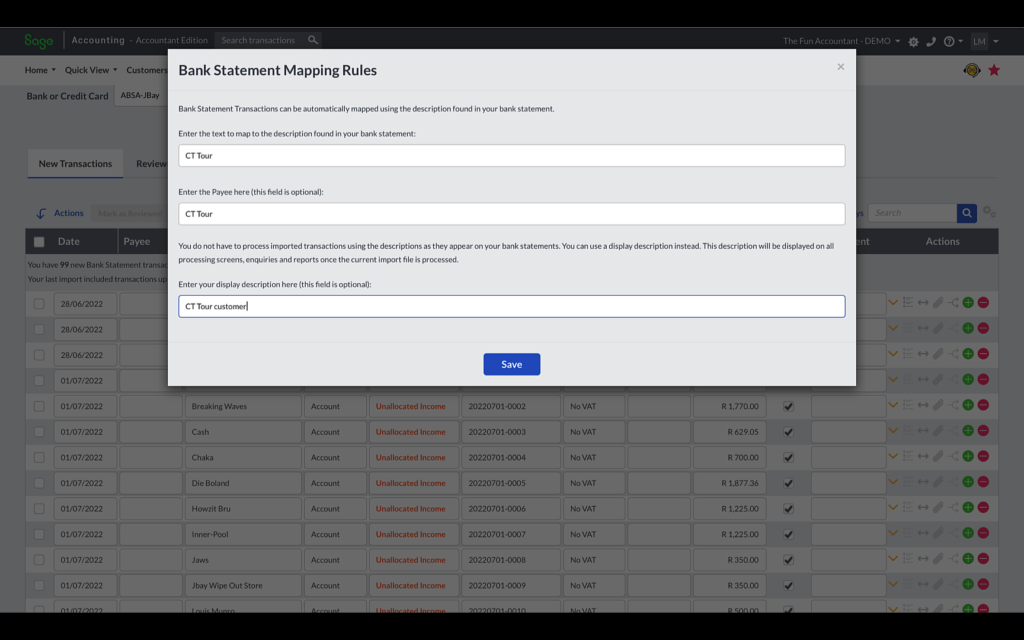
- In the first field the reference used by your customer when making the deposit to your bank is automatically reflected. This description will be used in future by Sage as identifying and linking a bank transaction to a particular customer’s account. I would encourage you to set characters that can be repeated and used by your customer as reference over and over when making a payment to you. For that reason an invoice number will not work because each invoice gets a unique invoice number and there is no set rule that can be linked to a particular customer. In this example I only use a customer name as reference, a unique customer code could have worked as well.
- The second and third fields are optional. In the second field you can add the Payee name for example when it is different from the customer’s account name.
- If you fill in the third field it will overwrite the description that appears in the bank transaction line. I don’t use this function a lot but let’s fill it in to show you the effect and maybe you can use it in your environment. To save the bank rule setting click on Save.
The Payee field is now filled in and the Description field has changed. The payee and description fields will always be applied in future when the bank rule picks up a transaction from this customer. When a bank rule is activated and applied to a transaction the three bullet points icon turns orange.
We have now identified and allocated all the money received in the bank from CT Tour automatically by setting up the rule, which will be applied in future and making our work and time spent allocating bank transactions less. What you see here is letting automation help you make accounting work quick and easy.
I am going to scroll back to the top to allocate the next transaction. I follow the same procedure:
- Change the type of transaction to customer
- Search and select the customer’s account
- Complete the analyses code
- Allocate the transaction to an outstanding invoice. Like with the previous transaction there are no invoices to allocate this receipt against.
- My fifth step is to set up the bank rule. As a side-note, be aware that Sage calls this process in the first field to enter the text to map the description in your bank statement to a customer account. I am going to fill in the Payee field and the description field as well and
- Save the bank rule mapping.
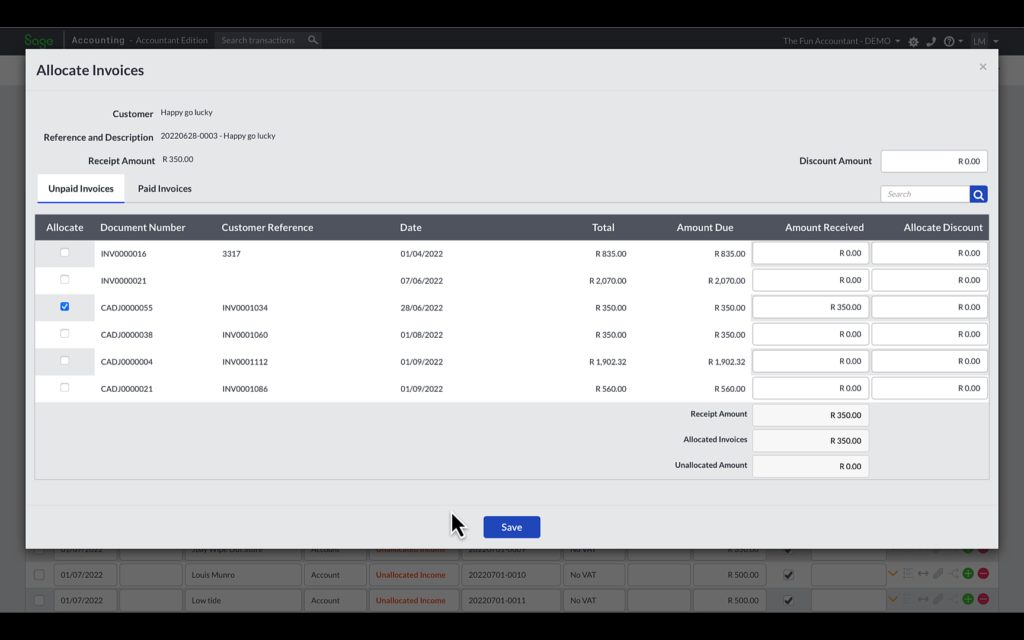
With the third transaction line I am going to follow the same process. The only difference is that with this receipt there are invoices against which the receipt can be allocated to. For that I am going to click on the allocate icon that can be found between the attachment and the green plus icon under the Actions column heading.

Now you can see how outstanding invoices are displayed in the Allocation menu.
- I find the invoice number that matches my receipt and
- click on the Allocate checkbox,
- then press Save.
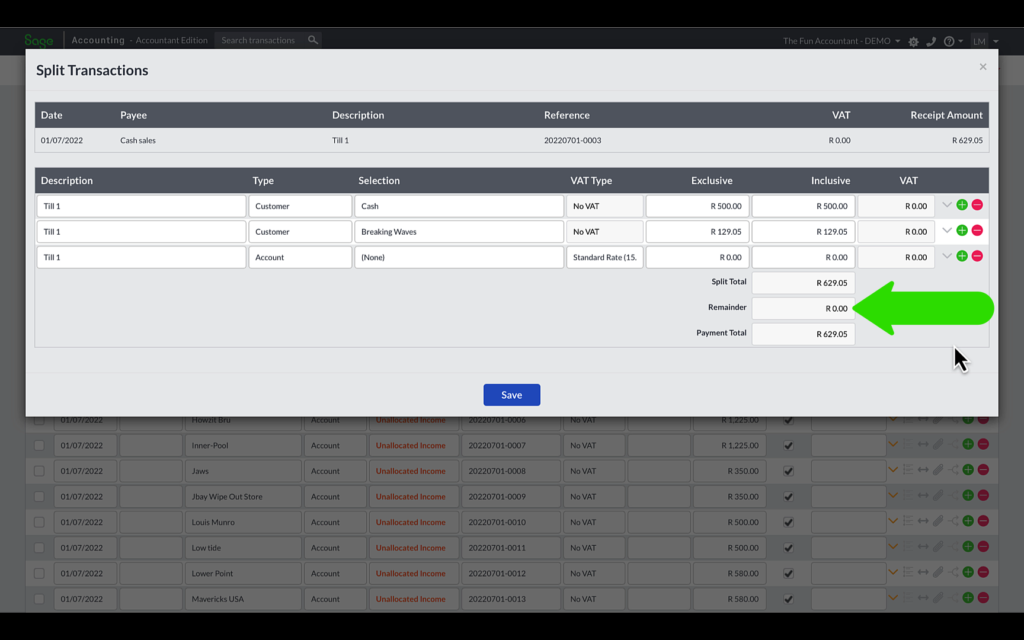
Splitting a bank receipt
To split a receipt click on the icon with the left and right arrow next to the Rule icon. A sub highlighted screen will open.
- In the first line the existing transaction amount is reflected.
- Complete the second line, for example this amount must be split between Cash and Breaking Waves customer. As you type the amount in the field you will see the Payment Total changes as well as the remainder which is there to help you balance the amount. Sage will not allow a split to be saved unless it balances to the amount received in your bank. I need to change the cash amount to R500 cash received. The remainder is Zero and
- the Payment Total agrees to the Split Total and now I can
- Save the Split Transactions.
- You can see that the Type and Selection fields now read -split-. And that is how you will identify any split transactions if you review your bank transactions.
Adding a manual transaction in a Sage cashbook.
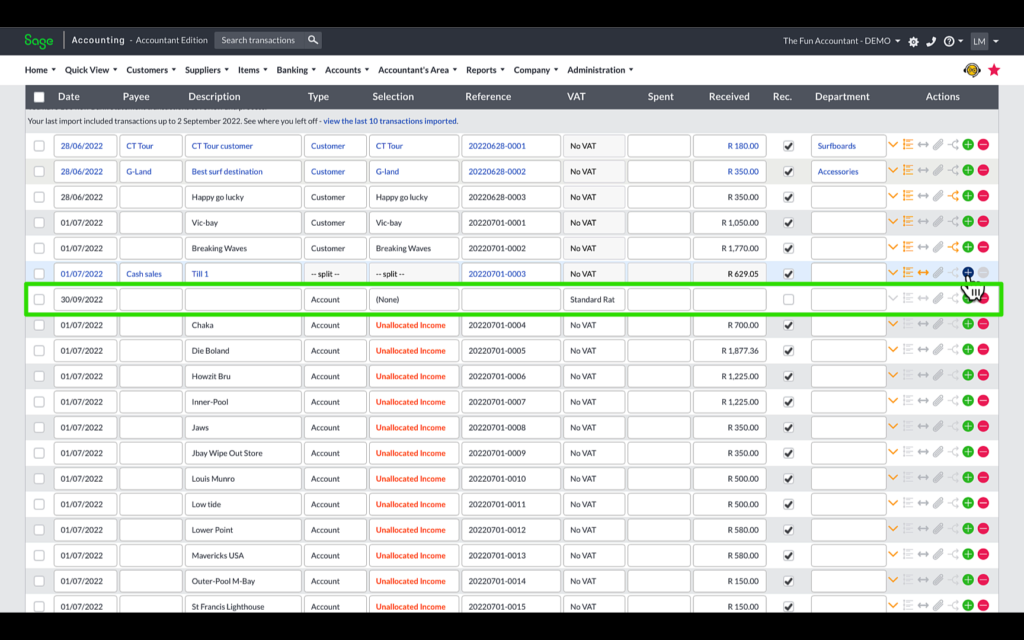
If you ever need to add a transaction manually within your set of transactions you can do so by clicking on the green plus button next to the allocate transaction button. Sage will add an empty line below the current line which you can type and complete manually.
- Firstly I am going to fill in the Date
- You can also copy data from other fields. I am copying the Cash Sales from the Previous Payee transaction line with Command C and paste it with Command V and I am doing the same with copying the Till 1 description as my transaction description.
- The type is customer again
- Select the cash customer
- Copy and paste the reference from above and change the last numbers
- Enter the receipt amount
- Match the receipt to an invoice in the Allocate Invoices screen. I am matching a R500 receipt to R287.50 invoice. As I am clicking to match, Sage displays the portion of the received amount that still needs to be allocated a R212.50 in the Unallocated Amount field. The Amount received column displays how much of the receipt has been allocated to a particular invoice. Click on save to save the allocation.
After creating a few bank mapping rules you will find that more receipts have been automatically allocated to customer accounts as revealed by the blue font transactions.
Once you have completed bank rules, you are basically left with checking and matching the receipt by allocating it to outstanding invoices.
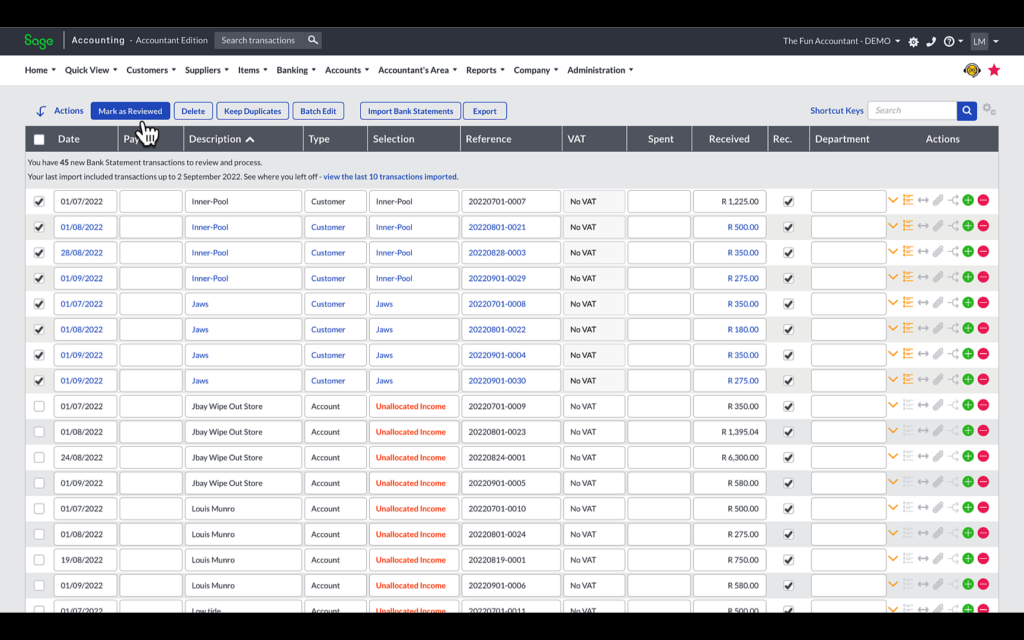
Earlier in the post I explained about the “Mark Selected as Reviewed” option. You can also find the same action button at the top of the cashbook. As I click on the checkbox next to the date of a transaction the view buttons above the column headings become visible. I am selecting all the transactions I have completed and want to move to the Reviewed Section. I work my way all to the bottom of the page and then click on “Mark Selected as Reviewed”.
Although I have marked all the transactions as reviewed, why are there still transactions that are completed and allocated as we can see by looking under the Selections column? It is because as the transactions are marked as reviewed and moved over to Reviewed Transactions, the transaction grid is filled from transactions of other pages.
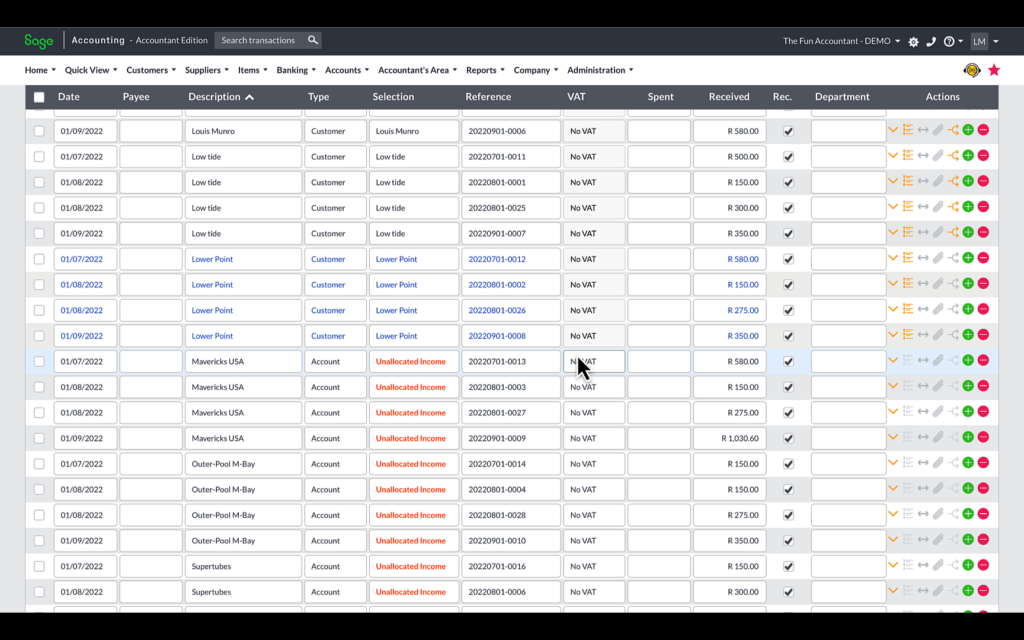
Sort bank transactions by description
Another great feature of Sage is the ability to sort the banking transactions by column heading. To show you the effect of that, I am sorting the data by the Description column. You can see that all the different receipts from a customer are grouped together based on the bank description. As soon as the bank mapping rule is applied all the transactions for that particular customer are allocated. Have a look at the Bank Rule effect on Lower Point customer account.
Perform an action on a batch of transactions
You can perform an action on all the transactions in the new Transactions screen by scrolling up to the top of all the transactions screen. Next to the Date in the Headings bar:
- click on the actions tickbox and all the transactions are selected.
- Then I can mark all the transactions as Reviewed by clicking on the button.
There are no bank receipts left to process and I click on Save changes.
The process of allocating customer receipts are completed when:
My work here is done and so will be yours after completing the processing of customer bank receipts and clearing all the bank receipts under the New Transactions tab in Sage accounting.
If you have not worked with sage accounting before I hope that this post has given you a fair idea of what processing customer bank receipts in Sage Accounting is all about and if you are an existing Sage user maybe you have picked-up a few shortcuts and tips to improve your efficiency and making admin task a breeze.

Sign up for Sage Accounting: