Onboarding employees can be challenging, but it doesn’t have to be. In this blog, we focus on how to add employees in Sage Business Cloud Payroll, making the process of employee onboarding as simple as possible.
Accurate entry of your employee’s information is crucial, because it ensures that employees are paid correctly and that all legal deductions are made properly. This accuracy also facilitates the correct declaration of taxes, in compliance with South African employee tax laws, and enables the precise issuance of IRP5 or IT3(a) certificates to both the employee and SARS. By adhering to these legal requirements, you not only comply with regulations but also protect your business from potential fines and legal issues.
Utilising the Employee Take-On Form
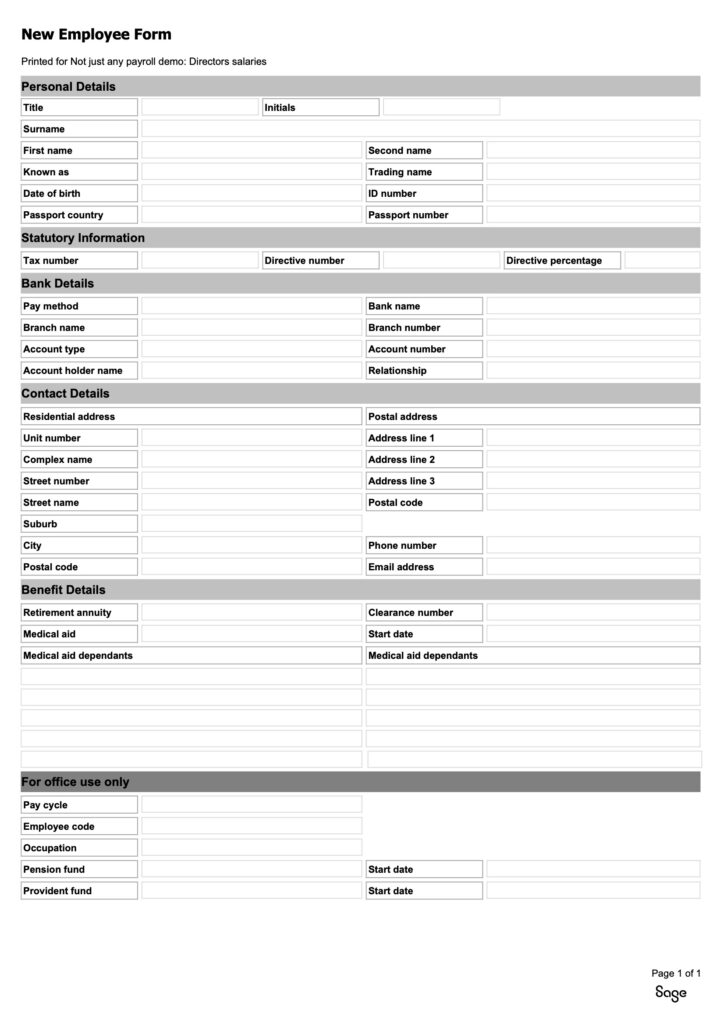
The Employee Take-On Form, a useful tool provided by Sage Business Cloud Payroll. This form streamlines the onboarding process by enabling new employees to input all necessary details themselves, reducing your administrative workload.
To access this form, navigate to:
- Reports’ at the top of the screen,
- then in the left sidebar, select ‘Employee’,
- and finally ‘New Employee Form’.
- Click ‘Preview’ to view the form.
The employee take on form is neatly organised with all the fields that your new employee needs to complete and submit. For your convenience, this form can be saved in PDF format.
You can download the form from my website from the link provided below:
This tool not only saves time but also ensures that all required information is collected accurately and efficiently, making the onboarding process smoother for both you and your employees.
Adding a New Employee manually
To add an employee, go to the top navigation menu and click on the ‘Employee’ menu. From the drop-down list, select ‘Add New Employee’.
Adding a new employee involves six steps. Let’s walk through each step, showing you exactly what it entails.
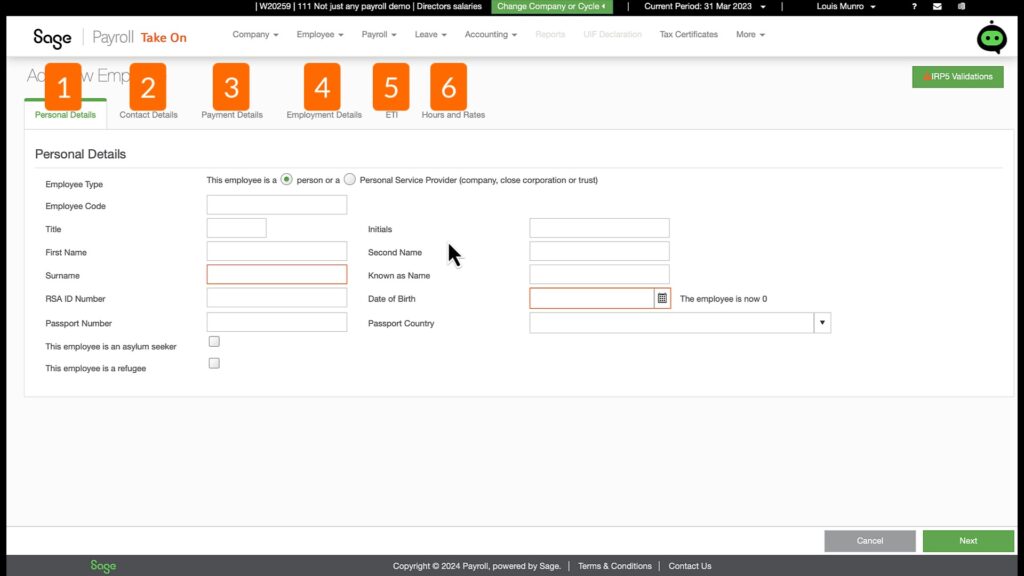
Step 1: Add Personal Details of Employees
- Employee Code
- Title
- Initials
- First Name, Second Name
- Surname
- ID Number
- Date of Birth (note: unfortunately, Sage does not automatically fill in the date of birth from the ID number, so this must be entered manually)
- Passport Number and Passport Country (required if the employee does not have a South African ID number)
- Indicate whether the employee is an asylum seeker or refugee (leave these boxes unticked for our example)
By carefully entering this information, you ensure that the foundational details of your employee’s profile are accurate and complete, setting the stage for a smooth payroll process.
Step 2: Add Employees’ Contact Details
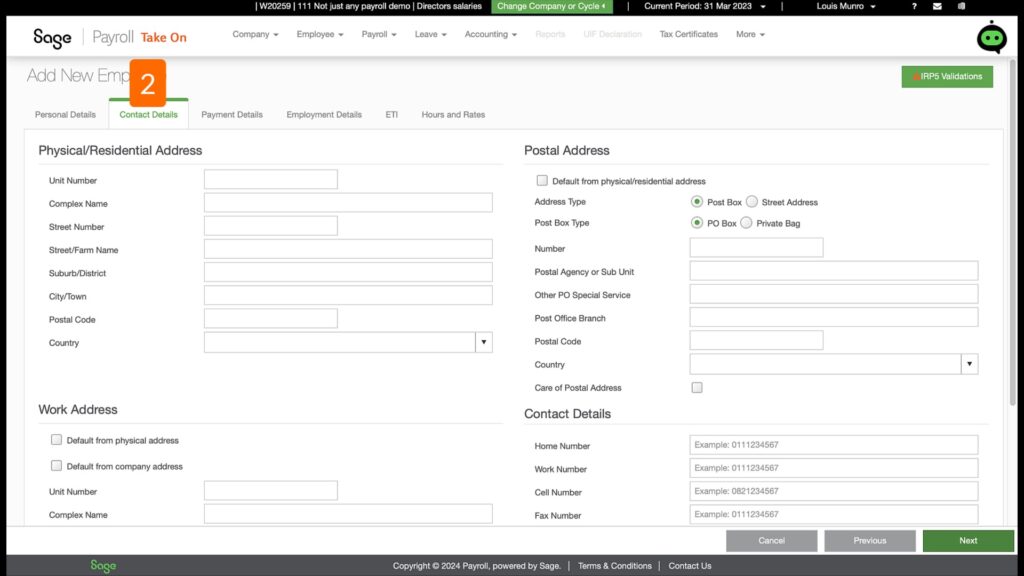
Click ‘Next’ to proceed to step 2 of completing the Employee details, which covers the employee’s contact details. Here’s what you need to fill in:
- Physical or Residential Address: Enter the employee’s home address.
- Postal Address: Use the ‘Default from Physical Address’ button to auto-fill this section if the postal address is the same as the physical address.
- Work Address: Speed up the process by using the company’s default address.
- Home Telephone Number: If available, enter the home phone number.
- Work Number: This must be filled in as Sage requires it to save the employee details.
- Cell Number: Enter the employee’s mobile number.
- Email Address: This is crucial as it’s the email address where the employee’s payslip will be sent.
- Emergency Contact Details: Fill in the contact information for someone to reach in case of an emergency. (Again, I’m using fictitious details for this demo).
Step 3: Payment Details
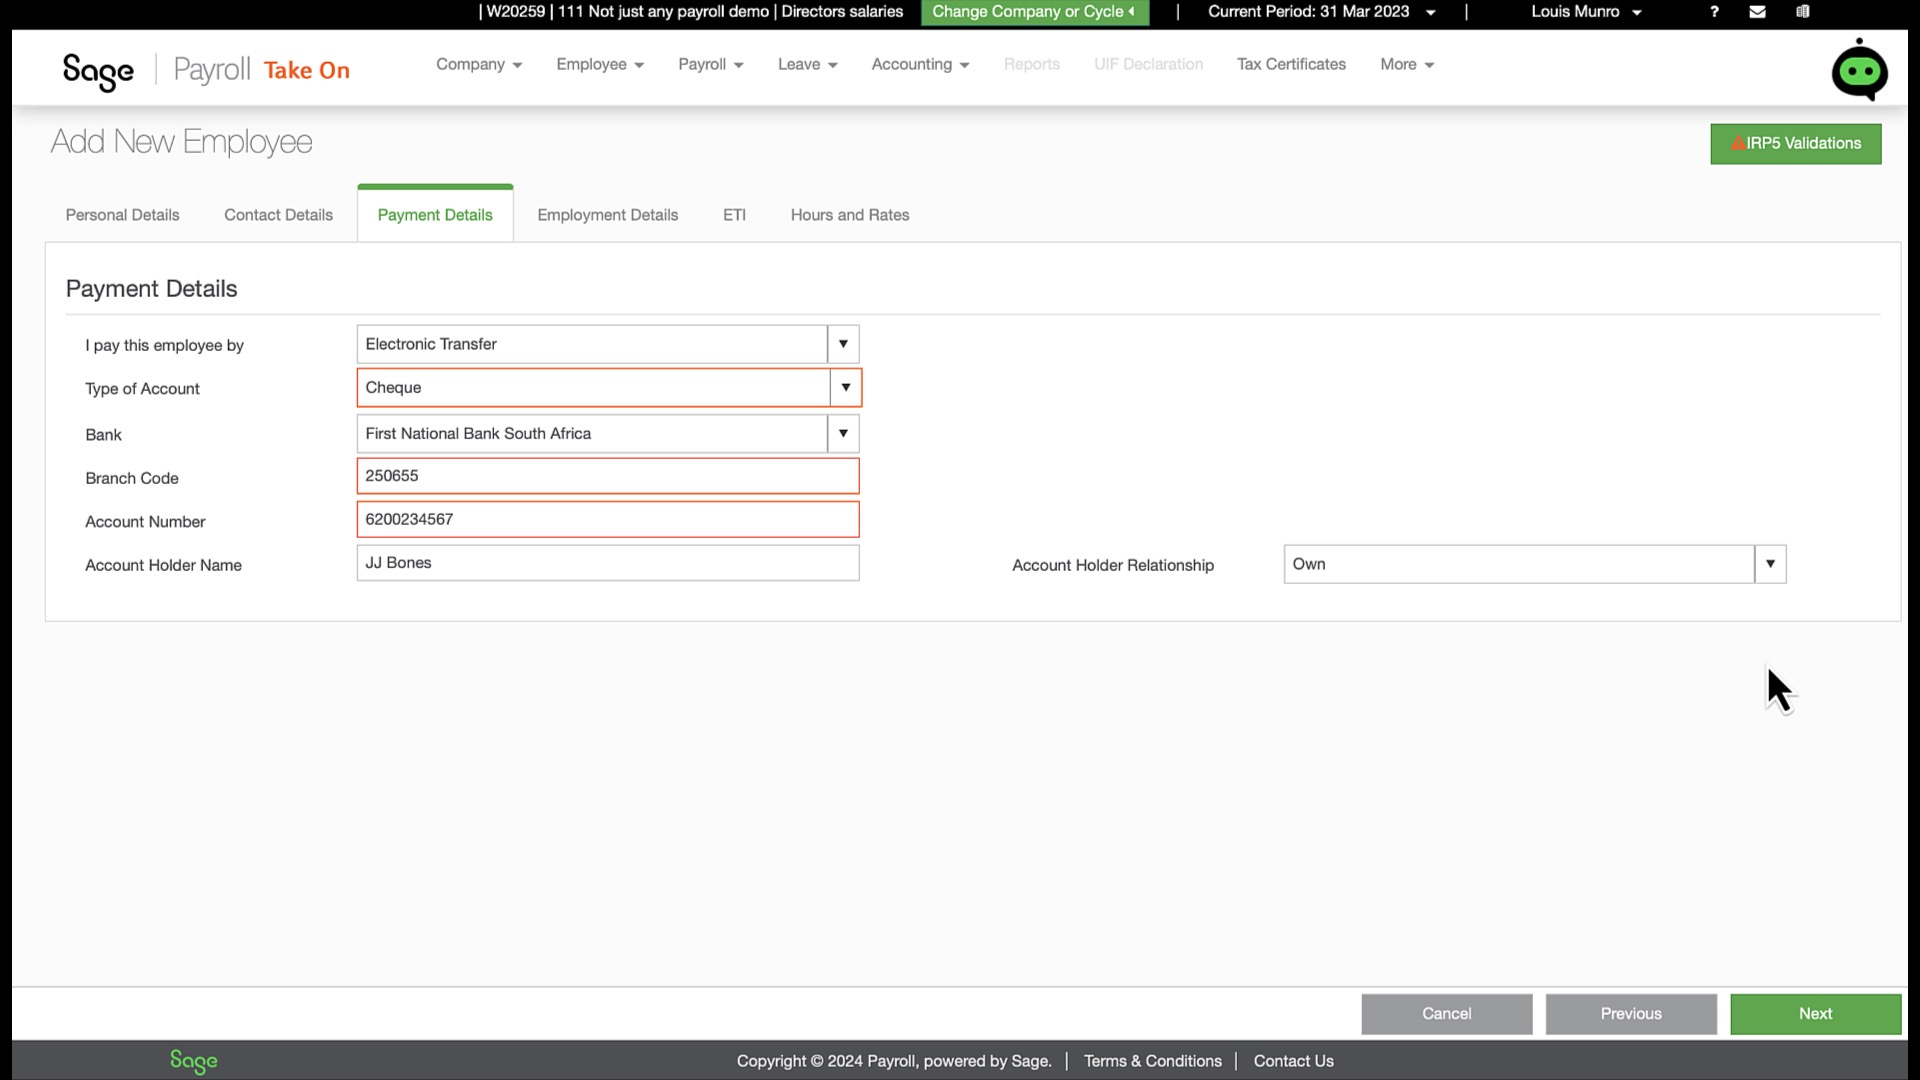
In step 3, we’re dealing with Payment Details. The default setting is cash, but Netcash is my preferred payment method for its advantages, especially when handling payroll for a larger organisation:
- Faster and easier than manual bank payments because the employees’ bank details only have to be entered once and the Net Pay is populated directly from Sage Business Cloud Payroll.
- More secure, reducing the risk of fraud because there is less human intervention as the Net Pay goes directly to your bank.
- Prevents errors due to the integration and allows simultaneous payments to all employees.
However, a message indicates that the ‘Netcash Setup is required’. We’re not going to delve into Netcash now but will deal with it in future content.
Instead, I’ll choose to pay the employee via Electronic Transfer, filling in the bank details here will ensure that the employees’ bank details are conveniently located in one place.
Step 4: Employment Details
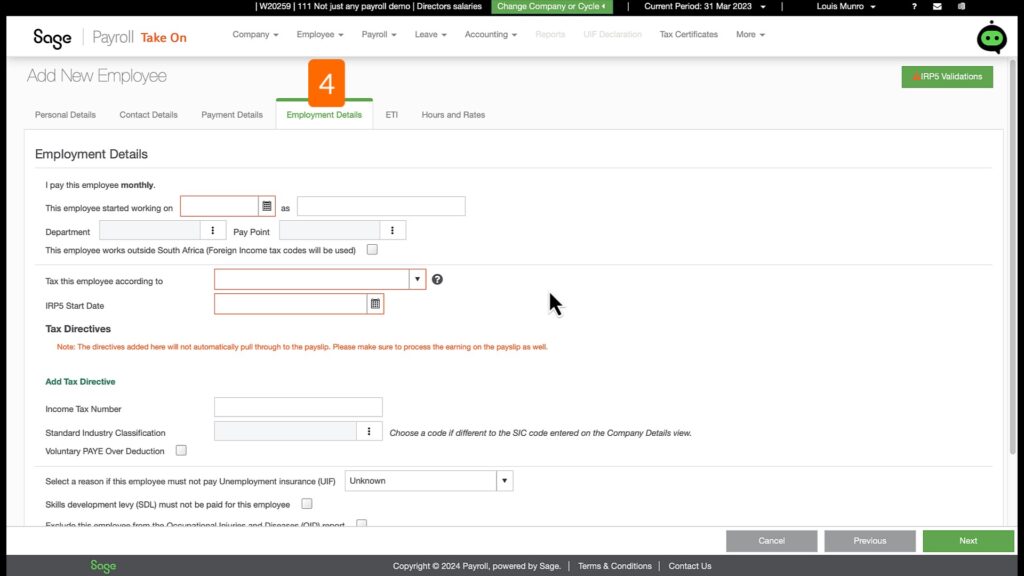
The fourth step involves entering the specific Employment Details for the new employee:
- Start Date: When did the employee start working?
- Job Title e.g. Production Manager.
- Department: For example, adding a Marketing department.
- Tax Calculation select the tax basis calculation, in most cases taxes are calculated according to statutory tables.
- IRP5 Certificate Start Date: The same as the employment start date for new employees.
- Employee’s Income Tax Number: If unavailable, it can be obtained during the IRP5 certificate lodgement phase.
- SIC Code: Automatically populated from the company’s details.
- Voluntary Over Deduction of PAYE: to be included if it was requested by the employee.
- UIF Deduction: In only rare cases UIF must not be deducted from employees.
- Exclusions: also rare but noting if an employee must be excluded from, Skills Development Levy, or the Occupational Injuries and Diseases submissions.
Step 5: Employment Tax Incentive (ETI)
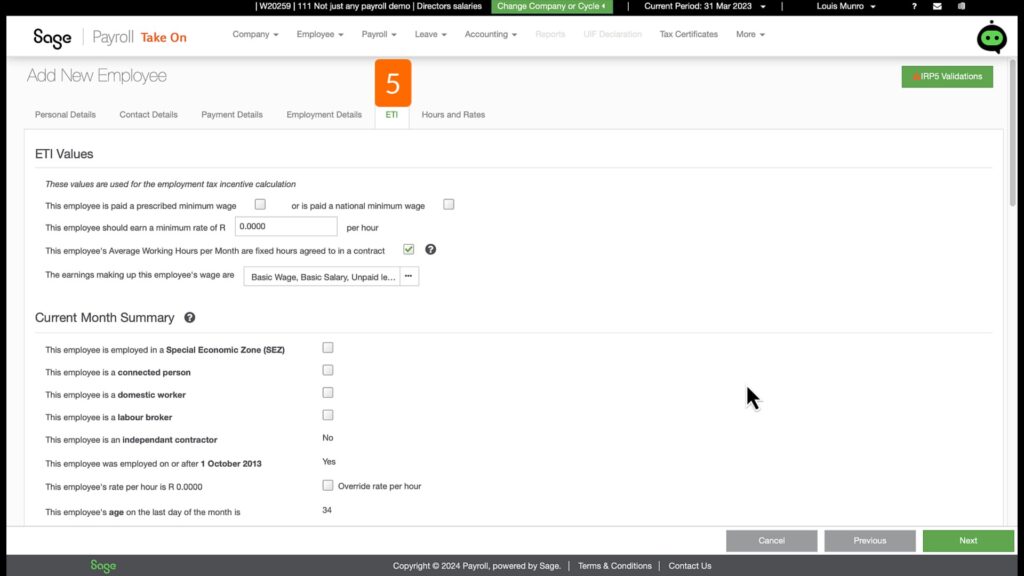
Click ‘Next’ to proceed to the fifth step, which covers Employment Tax Incentives (ETI). This step is crucial for employers in South Africa looking to take advantage of government incentives designed to encourage the hiring of young job seekers.
What is ETI?
The Employment Tax Incentive (ETI) is a government initiative aimed at encouraging employers to hire young people. Employers who qualify can receive a PAYE tax refund, reducing their PAYE tax liability. To qualify, employers must hire individuals aged between 18 and 29 who earn less than R6,500 per month.

Simplifying ETI with Sage Business Cloud Payroll
For business owners who are new to Employment Tax Incentive (ETI), Sage Business Cloud Payroll makes the process remarkably straightforward. By following the system’s prompts and accurately filling out the Employment Tax Incentive (ETI) section, you can easily manage this incentive. Sage handles all the necessary calculations and eligibility checks, ensuring you receive the PAYE refund if your employee qualifies.
Important Reminder
It’s important to remember that SARS conducts audits on Employment Tax Incentive claims. If you’re unsure how to apply Employment Tax Incentive correctly in your organisation, seeking professional help is advisable. This ensures that you navigate the complexities of Employment Tax Incentive (ETI) with confidence and compliance.
Navigating the ETI Setup
During the Employment Tax Incentive (ETI) setup, you will encounter the ‘ETI History’ section. This part is particularly helpful during the first period of employment. It allows you to review and select periods when an employee was previously employed and claimed Employment Tax Incentive (ETI), either within your company or an associated institution. This feature helps prevent duplicate claims, ensuring compliance with the law.
Sage guides you in determining if the employee is still eligible for further Employment Tax Incentive (ETI) benefits by tracking and recording their employment history across associated institutions. This thorough tracking ensures that Employment Tax Incentive (ETI) is claimed correctly and that all regulatory guidelines are followed, helping you stay compliant and avoid penalties.

In essence, Sage Business Cloud Payroll takes the complexity out of Employment Tax Incentive, allowing you to focus on what matters most: growing your business and supporting your employees.
Step 6: Finalizing Employee Details
Once you click ‘Next,’ you’ll arrive at the sixth and final step of the employee setup process. This step is all about recording the employee’s contractual hours and salary rate, ensuring that all compensation details are accurately captured.
Recording Hours and Salary
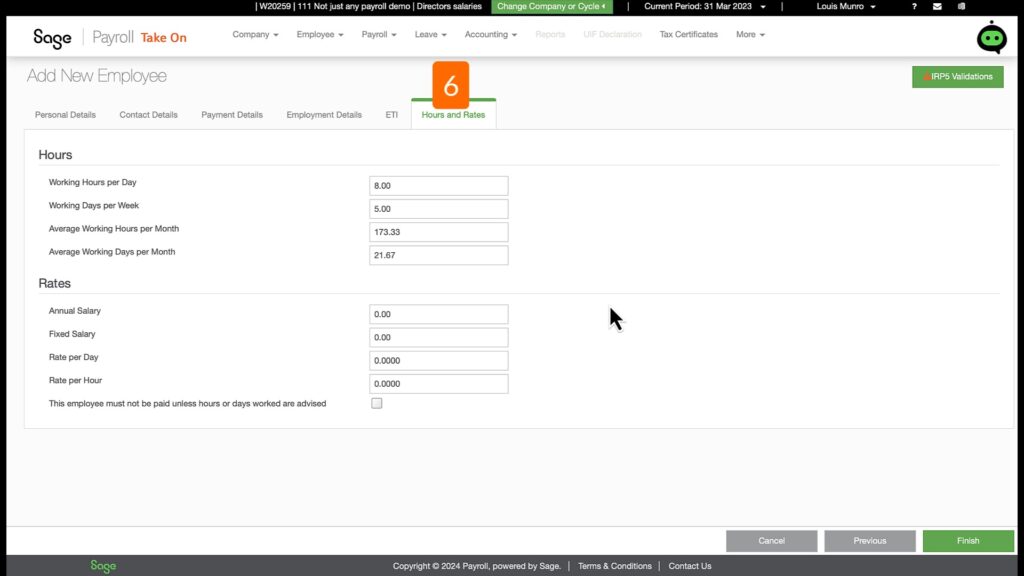
In this step, you’ll enter the employee’s annual salary or specify their hourly or daily rate. Sage Business Cloud Payroll makes this process straightforward by automatically calculating and filling in the remaining salary details based on your input. This automation ensures that your payroll calculations are precise and consistent, saving you time and reducing the chance of errors.
Completing the Setup
After entering the salary details, simply click ‘Finish.’ This action updates and saves the employee’s information in the system.
Addressing Potential Validation Errors
While there are additional sections to update before running payroll, it’s important to first address potential issues with validation errors. Ideally, you should avoid these errors if all the information entered during the employee setup meets the predefined criteria and rules. These rules are designed to ensure that data is correctly entered, all required fields are completed, and legal requirements are met.
Handling Validation Errors and Completing Employee Information
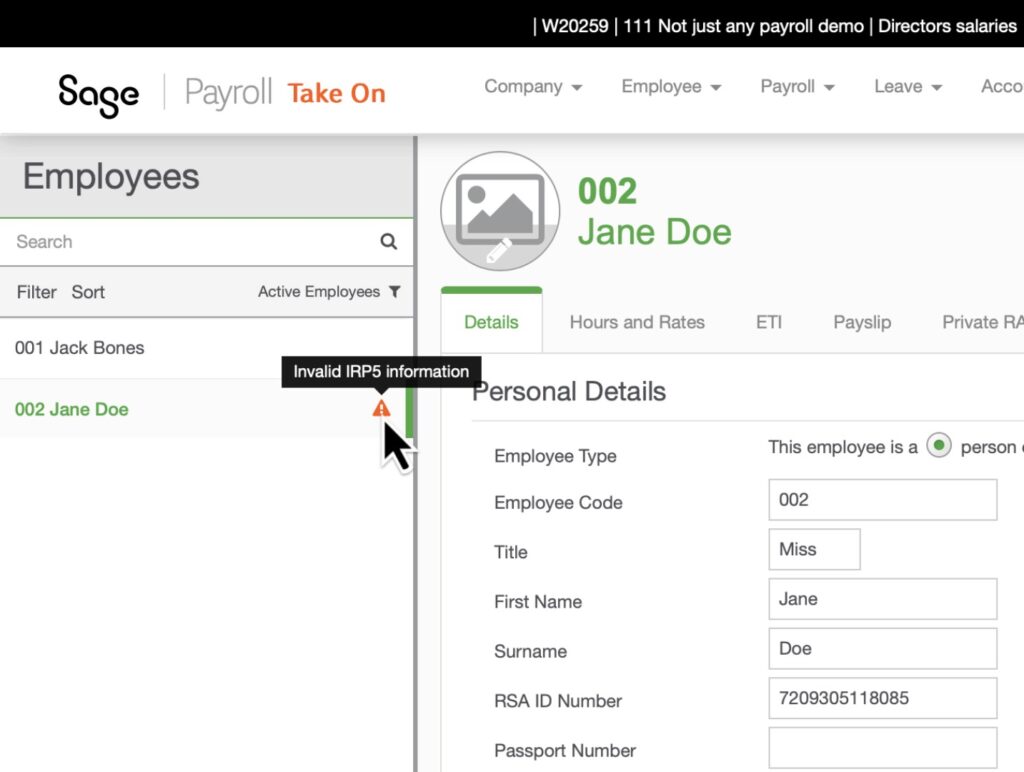
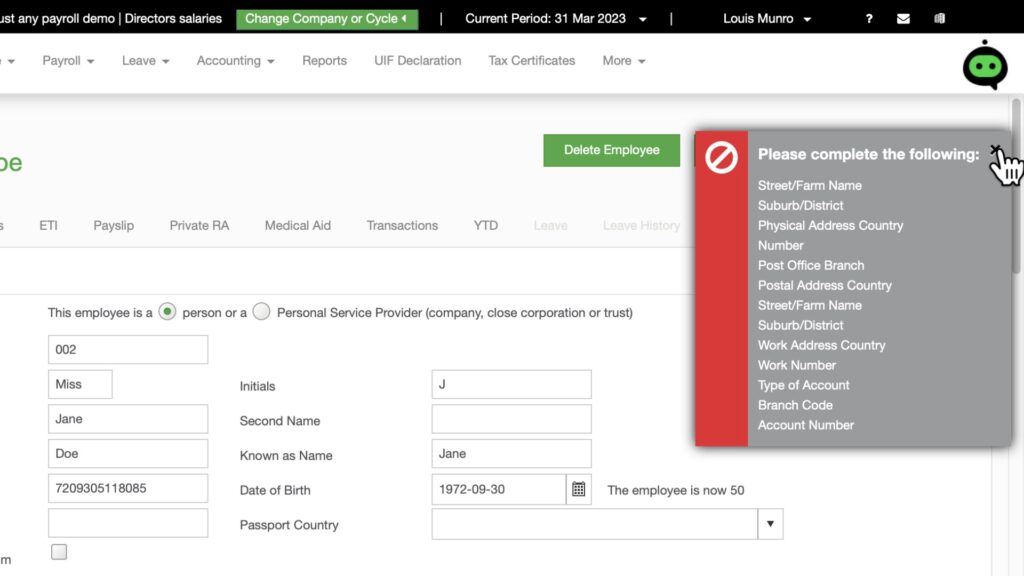
Upon completing the initial employee setup, you might notice an exclamation mark next to the employee’s name, indicating ‘Invalid IRP5 information.’ This alert signals that some critical data is missing or incorrect. To identify the specific issues, use the IRP5 Validation button, which will highlight the areas requiring attention.
Validation error occur’s due to incomplete fields, such as addresses, telephone numbers, and bank details. These incomplete fields are marked with orange font descriptions to guide you through the necessary updates.
Here’s what you should do:
- Review Missing Information: Click on the IRP5 Validation button at the top of the page to see exactly what is still needed.
- Obtain and complete all the information needed until the validation error disappear.
- Save Your Progress: Save the information you’ve entered so far. This allows you to store your progress and return later to complete the remaining details. The system updates and stores your information, even if validation errors persist.
As you continue:
- Add the Missing Details: To resolve the incomplete fields.
- Proceed Without All Data: You can still move forward in the payroll setup process even if some details, like the employee’s tax number, are not yet available. This flexibility allows you to carry-on with a payroll run even though there are outstanding information.
If the tax number is not immediately available, it won’t prevent you from advancing. Validation errors related to the tax number may disappear once you update the employee’s tax registration number fields.
To resolve validation errors related to missing tax numbers, check out our detailed video on how to verify employee tax registration numbers using Easyfile ? Watch our detailed video on how to check employee tax registration numbers using Easyfile.?????
Final thoughts on how to add employees manually in Sage Business Cloud Payroll
Adding employees in Sage Business Cloud Payroll doesn’t have to be a daunting task. By following the outlined steps and utilizing Sage’s intuitive features, you can streamline the onboarding process, ensure accurate payroll management, and maintain compliance with South African tax laws.
Remember to complete all necessary fields, address any validation errors, and make use of helpful tools like the Employee Take-On Form. For any specific challenges, such as missing tax numbers, our detailed video on Easyfile is a great resource. With these tips, you’re well-equipped to handle your payroll needs efficiently and effectively.


