We’re going straight to the essentials—adding a new company and setting up company details to start your payroll with Sage Business Cloud Payroll.
To complement this blog post, we’ve created an in-depth YouTube video that walks you through the process of starting a new company and adding company details in Sage Business Cloud Payroll.
In the video, Louis Munro provides a step-by-step guide to ensure you set up your company correctly from the start. This visual tutorial highlights key aspects of the setup process, making it easier for you to follow along and avoid common pitfalls. Be sure to watch the video below for a comprehensive walkthrough and additional tips to streamline your payroll setup.
Managing a payroll can seem daunting
But it doesn’t have to be! The complexities of Employee Tax, UIF, and SDL contributions, along with issuing payslips from the moment you hire your first employee, can make payroll management feel overwhelming, especially for a small business owner.
However, you can run a smooth payroll, whether you’re a small business owner, a startup, or part of a larger organisation with Sage Business Cloud Payroll. This cloud payroll software allows you to create your first payslips, generate essential reports for submissions to authorities, and ensure that your staff is paid on time with ease and precision.
Enter a Company number and Company name

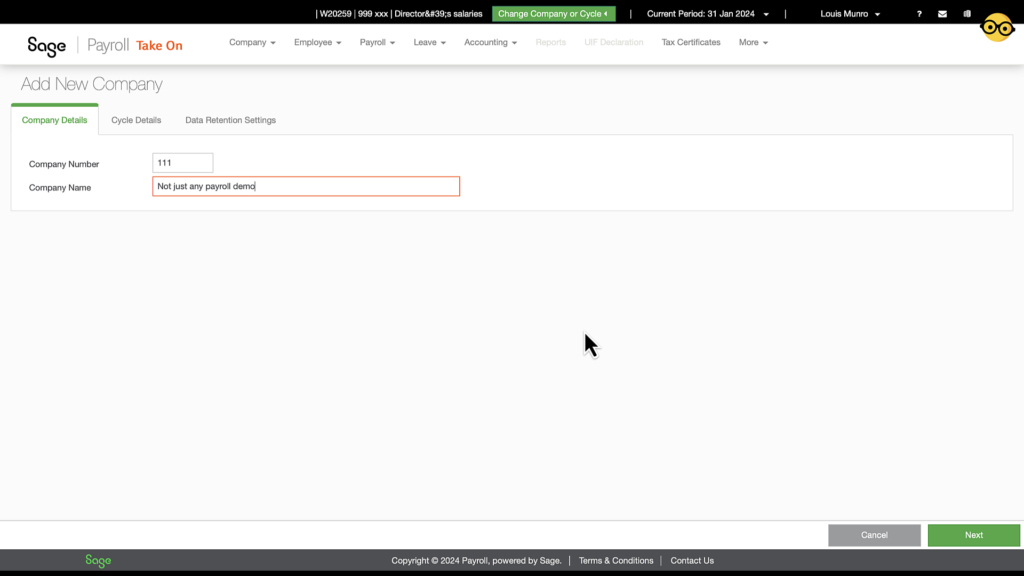
The whole process of starting a new payroll begins by entering a company number and company name. In this context, “company” refers to any and all types of organisations—basically anyone in business who employs someone.
Then the Payroll Cycle details

After entering the company number and name and clicking ‘Next,’ you will be directed to the ‘Cycle Details’ section, which is the next essential step in setting up your payroll in Sage. Here, you can manage your payroll cycle across periods like weekly, bi-weekly, or monthly, and even across different branches or departments of your business.
For an in depth exploration of cycles have a look at this blog post —>> payroll cycles
Essential Company Details for Accurate Payroll Management

The next step after establishing a payroll cycle is to enter the company details.
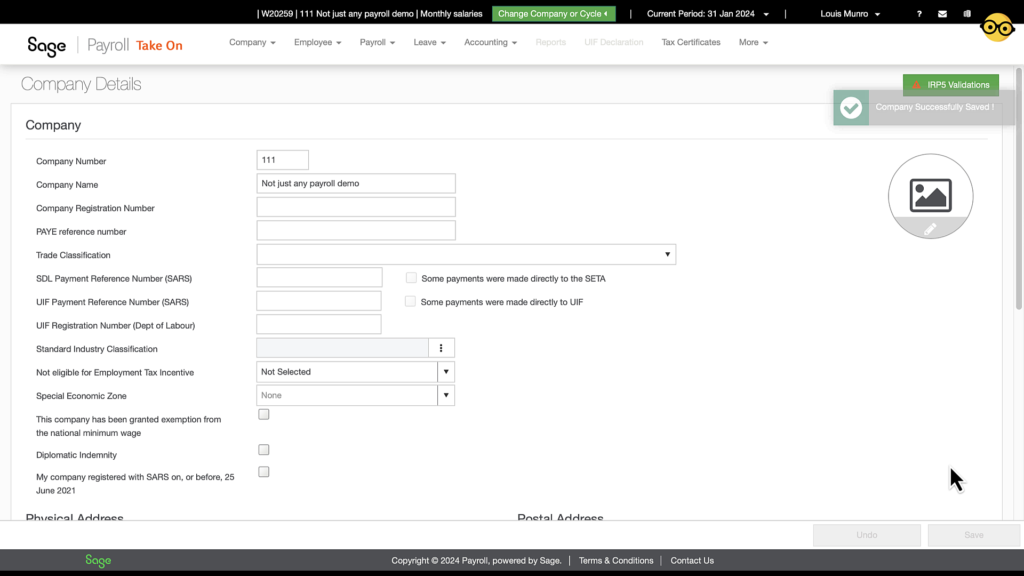
Something to note is that there are 12 fields to complete when you start filling in the necessary information for your company, each one critical for accurate payroll management. Follow along as we go through them one by one.
The 12 Critical Fields for Company Information

- Company Registration Number: Enter your company’s official registration number.
- PAYE Reference Number: This is your SARS employer registration number. If your number is incorrect, the system will display an invalid number message.
- Auto-completion of SDL and UIF Numbers: Notice that after entering the PAYE number, the SDL and UIF numbers are automatically completed.
- Trade Classification: Enter the trade classification code. You can use code 2572 for “other business services” if there is no code representing your trade.
- UIF Registration Number: Fill in your registration with the Department of Labour’s Unemployment Insurance Fund. This is different from the SARS UIF collection number.
- Standard Industry Classification: From the menu, select the most appropriate industry category for your business. There are numerous codes to choose from.
- Employment Tax Incentive (ETI) Scheme: If the business does not qualify for the ETI scheme, select the reason from the provided options. If it does qualify, leave the selection as ‘Not Selected.’
- Special Economic Zones: If the business operates in one of the 6 Special Economic Zones, you can select it here.
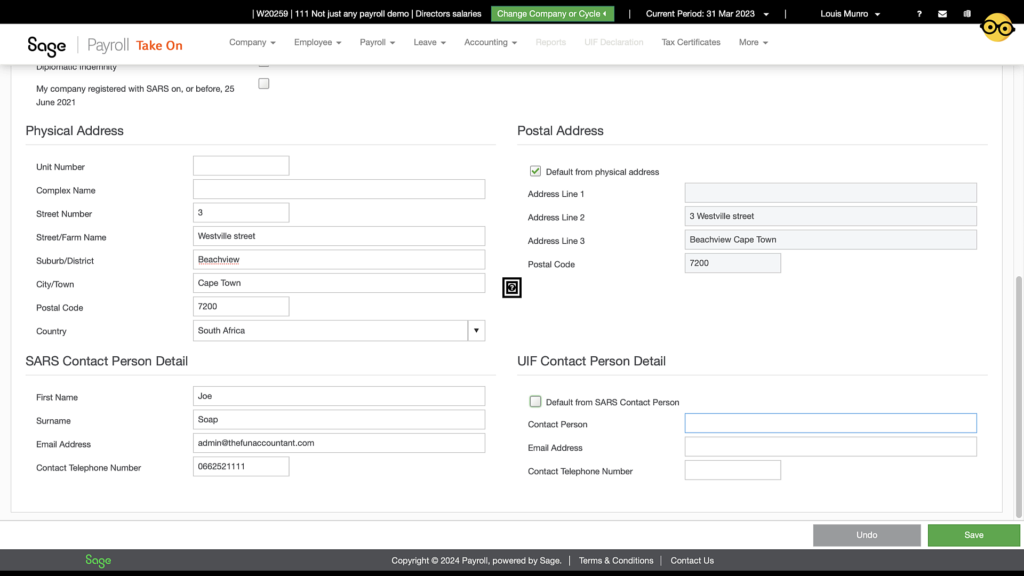
- Physical Address: Complete the fields for the business’s physical address.
- Postal Address: If the postal address is the same as the physical address, tick the ‘Default from physical address’ box to automatically populate the fields.
- Contact Person with SARS: Enter the details of the contact person responsible for submitting returns to SARS. This information is compulsory.
- UIF Contact Person: If the details for the UIF contact person are the same as those for SARS, tick the box for quick completion.

Adding the Company Logo for Professional Reports and Payslips

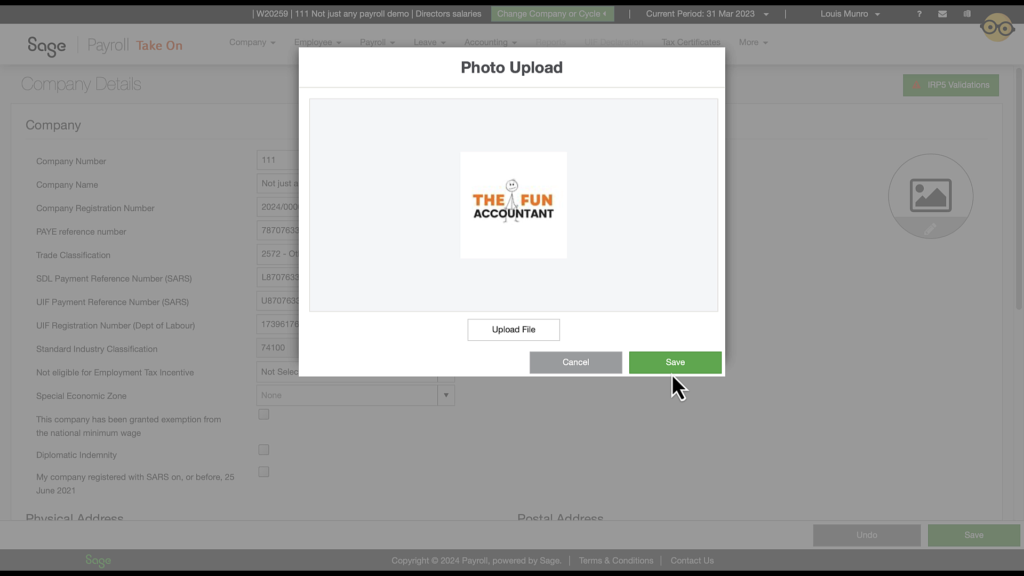
Before saving the Company Details, the company’s logo is added to enhance the appearance of reports and employees’ payslips. The logo is uploaded from the PC and seamlessly added. Once the logo is uploaded and looks good, the process is completed by saving it.
Review before saving your company settings
A quick review confirms that all the required fields have been completed, and the final action is to save these settings. And just like that, the company is set up and ready to roll in Sage Business Cloud Payroll!
Your Payroll is ready to roll!
Setting up a new company in Sage Business Cloud Payroll is a straightforward process when you follow the steps outlined in this guide. By entering the necessary company details, including registration numbers, addresses, and industry classifications, you ensure that your payroll system is accurate and compliant. Adding a company logo enhances the professional appearance of your reports and payslips, providing a polished look for your business documents.
Now that your company is set up and ready to roll, you’re well on your way to managing payroll efficiently and effectively with Sage Business Cloud Payroll. If you found this guide helpful, be sure to check out our accompanying YouTube video for a visual walkthrough and additional tips. Don’t miss out on our next post, where we’ll continue to unravel more payroll secrets and help you master your payroll tasks with ease.
Stay tuned for more insights, and feel free to reach out with any questions or topics you’d like us to cover in future posts. Thank you for reading, and happy payroll processing!


