Hello, dear readers! Welcome to this step-by-step tutorial, designed to guide you seamlessly through the importation of a trial balance into Sage Accounting. Whether you’re a small business owner, an accounting student, or someone just getting their feet wet in the world of finance this comprehensive guide is designed for you to master Trial Balance Imports from Excel into Sage Accounting.
Simplify Your Accounting with Easy Trial Balance Imports.
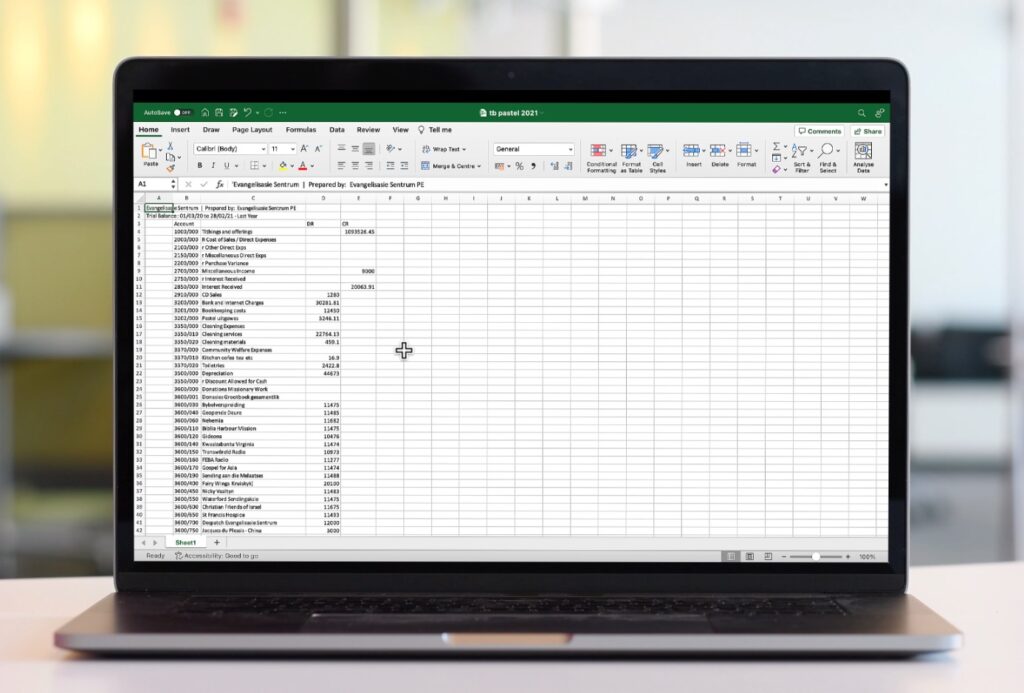
This tutorial has been crafted from a real-world example: my own experience of importing a client’s trial balance originally exported from Pastel Desktop Accounting. Throughout this guide, I’ll share insider tips and tricks to make your process as smooth and efficient as possible. Let’s dive right in and say goodbye to manual data entry hassles!
Test the Waters with Sage Accounting ?

Before we proceed, if you’re new to Sage Accounting, why not try it out first? Click here for a 30-Day Free Trial in the Africa-Middle East Area. Your trial period will give you a comprehensive look into how Sage can transform your accounting procedures. Plus, if you decide to go for the paid version, it helps me create more useful content for you (at no extra cost)!
The Importance of a Trial Balance.
A trial balance serves as the backbone of your accounting system. It’s a snapshot of all your business accounts at a specific moment in time, summed up into debit and credit columns.
The Roadmap: Five Easy Steps to Mastering Trial Balance Imports.

We have simplified this process into five easy-to-follow steps:
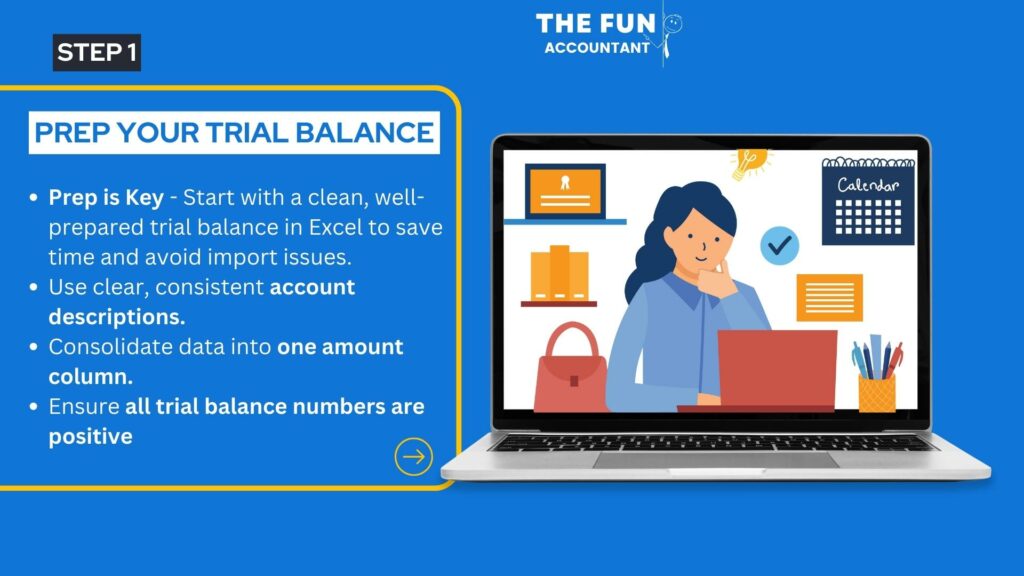
1. Preparation is Key
Your first step is setting up a well-prepared trial balance in Excel.
2. Copying Data
The second step involves transferring data from your Excel file into a Sage-compatible template.
3. The Sage Import
Step three is all about uploading your CSV file and mapping the import fields.
4. Troubleshooting
If things don’t go as planned, step four will help you sort things out.
5. Navigating and Correcting Discrepancies
Finally, we’ll look at how to make sure your financials are accurate once your data is imported.
Let’s dig in and get you up to speed on Sage Accounting, setting a solid foundation for accurate, hassle-free financial reporting.
Refer to our video tutorial for a live demonstration.
Preparing Your Trial Balance Excel file for a seamless import into Sage Accounting.
Let’s dive right into preparing your original trial balance for a smooth import into Sage. In most cases your Excel exported spreadsheet will have the following columns:
- Account numbers
- Account descriptions
- Debit balances
- Credit balances
Crafting Your Original Excel File.
Start with your original Excel-based trial balance.
Remove Unused Accounts: Accounts with zero balances should be removed to declutter your spreadsheet.
Rename Accounts: Opt for more appropriate account descriptions.
Merge Accounts: Consider combining similar accounts into a single, more encompassing account.
Single Column for Balances: Sage prefers one column for all balances, so you’ll want to merge your debit and credit columns into a single column.
Remove Totals and Net Loss Lines: These are not required for the import process.
Balances: The Heartbeat of Your Accounts:All the balances must be positive. This is crucial as negative balances will throw off your calculations and ultimately make the import unsuccessful.
Eliminate Errors: Watch out for #Value cells and remove them. They often appear due to empty account descriptions.
—–>>>>>>Download our handy Excel template to get started quickly.
Finding the Sage Import Starting Point.
In Sage Accounting, go to the List of Accounts screen, where you’ll find the “Import Accounts” button. This button is your gateway to transferring your well-prepared Excel file into the Sage Accounting system.
- Go to Accounts,
- Click on Lists,
- Then select List of Accounts.
- At the top, click on “Import Accounts,” and then click on “Import Guide and Templates.”
The Import Screen: Your Control Panel.

Download the Sage Import template and then follow these steps:
- Copy Data: Meticulously copy your data from your cleaned-up spreadsheet to the import template.
- Assign Categories: Categories like Sales, Expenses, and Assets must be assigned to each account.
- Transfer Opening Balances: Ensure your opening balances are aligned perfectly within the template.
- Opening Balance Date: Include this date in the designated column.
- Account Status: Mark all the accounts as active or inactive based on their current status.
- Default VAT Type: If applicable, specify the default VAT type for each account.
The Final Approach – Sage Accounting.
In Sage Accounting:
- Hover over ‘Accounts’,
- a descent to ‘Lists’,
- and we’re presented with the ‘List of Accounts’.
Though Sage provides a buffet of standard accounts, it’s evident that one size doesn’t fit all. Every business has its unique footprint, and in my case, the trial balance and descriptions were unique, standing out from Sage’s offerings.
However, importing them is a breeze. A single click on “Import Accounts” sets things rolling.
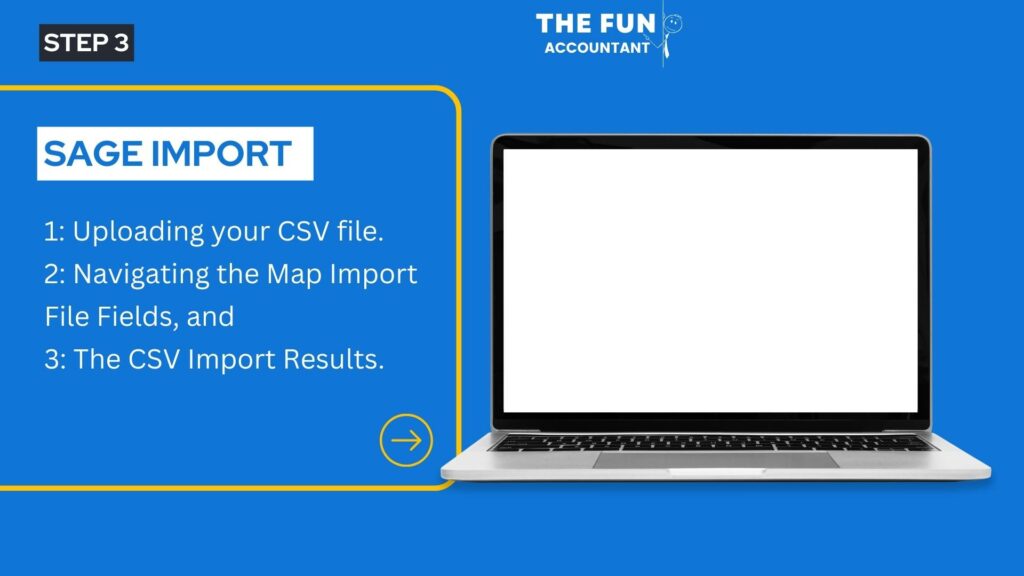
Diving deeper into the import process, it’s split into three intuitive steps:
- Uploading the CSV File: As simple as choosing your meticulously prepared file.
- Map Import File Fields: This step is about creating a bridge between your data and Sage Accounting, ensuring there’s a clear pathway for each piece of information. After browsing and selecting your prepared Excel file, the Map Import File Fields screen will appear.
This is where you map your Excel columns to Sage fields. While it all might seem complex. It’s all about aligning our data with Sage Accounting’s parameters. And not to forget, you have the liberty to decide what goes in and what stays out – like my choice with the Default VAT Type.
Take one final look at your mappings, and once you’re sure that everything is as it should be, click “Next.” Your accounts will then be imported into Sage. - The Culmination – CSV Import Results: This is the crescendo, where all the prep comes to life.

Troubleshooting Errors and Aligning Balances.
However, life, as we know it, is full of surprises. In my case, 33 rows made it smoothly, while 43 took a scenic route. It’s a reminder that no journey is without its bumps. But, as with any challenge, there’s always a way forward. Let’s navigate through this hiccup together which might serve you well if you should ever get stuck.

Using the Import Log File for Troubleshooting.
Before you click “Finish” on the import, first download the Import Log File. This file will show you any errors in your import, such as rows that failed to import and why. If you find that the “Expense” category doesn’t exist, check the Import File Template for the correct terminology. Often, it’s a small typo, like missing an “s” in “Expenses,” that can cause the issue.
You can address these errors by revisiting your Excel file, making the necessary changes, and then re-importing the rectified rows.
Rectifying the Import Errors.

Follow these 9 steps to rectify the errors:
- Return to Import File: Open the CSV file that you tried to import.
- Isolate Errors: Delete rows that have already been imported successfully.
- Correct Errors: Change “Expense” to “Expenses.”
- Save the Changes: Save the file after making these adjustments.
- Back to Sage: Now click “Finish” on the previous import.
- Start a New Import: Click “Import Accounts” again on the List of Accounts screen.
- Upload New File: Upload the corrected CSV file.
- Proceed Through Steps: Click “Next” until you reach the final import screen.
- Execute Import: Execute the import.
The corrected rows should now import successfully.
Fine-Tuning Account Balances.

After the successful import, you’ll notice that some balances, like “Accumulated Depreciation,” are incorrect. They may show as positive balances when they should be negative, because of the single amount column pre-requisite of Sage Accounting.
Fix the debit amount by turning it into a credit:
Locate Account: Go to the List of Accounts and search for the specific account you want to correct.
Edit Account: Click “Edit” next to the account.
Adjust Balance: Insert a minus before the amount to make it a credit balance.
Save Changes: Click “Save” to apply the changes.
Repeat this process for any other inverted accounts that need adjusting.
Aligning Bank Balances.

We have not yet touched the bank accounts or “Cashbooks”. Follow this 4 step process to align your bank account balances.
- Navigate to Banking: Go to “Banking” in the Top Navigation Menu and then click on “Lists.”
- Add New Account: Click “Add a Bank or Credit Card.”
- Fill in Details: Enter the account name, account number, and opening balance.
- Save and Continue: Click “Save and New” if you have more accounts to add.

Final Checks with Sage’s Opening balances feature.
Return to your trial balance to ensure everything is aligned. If there are still discrepancies, you can adjust them under “Opening Balances” in the Company tab in the navigation menu. Be cautious when making changes here as it can materially impact your financial records in a bad way.
Conclusion: The Arrival
Congratulations, you’ve successfully imported your trial balance into Sage Accounting. You’ve tackled errors, made crucial adjustments, and ensured that your accounting system is a true reflection of your business’s financial status.